Partners

Newsletter Sign-up


Lovely Sponsors


Currently Obsessed

Subscribe

Lovely Press

Disclaimer

From time to time Creature Comforts may include affiliate links to products featured in their posts and/or affiliate banner ads. However posts and featured products seen on Creature Comforts are never controlled or selected by advertisers or affiliates. Featured items are products that we personally like, and would share regardless of affiliate partnerships. If you choose to purchase an item that has been featured from an affiliate link or ad banner, we may receive a small commission on that sale.

Privacy Policy
Hosted by

Entries in D.I.Y. + Projects (281)

Friday
Dec052008

D.I.Y. Repurposed Catalog Hanging Flower Decorations

I first spotted these awesome Repurposed Catalog Hanging Flowers over on Garden Party blog and just had to share them with you all.  They were created by the blogger behind Zakka Life, and I think they are just genius!  Just think of how gorgeous your old J.Crew catalogs would look given new life as these festive decorations! For directions, visit Zakka Life. Thanks Garden Party for finding it first!

Stay tuned for a fun giveaway and contest coming up in just a bit, AND a fabulous d.i.y. project I'll be doing later today as part of my birthday celebration with my family!  See you then.

Wednesday
Dec032008

Paper Scraps + Celery = Fabulous Gift Wrap

Yes, you read the title correctly... Celery!  Today I put together a little photo tutorial on creating your own gift wrap and tags using celery as a stamping tool.  This has been done before (it's not an original concept)... this is just my take on it.

I got into trouble for calling my last project "eco" so I don't want to make the same mistake here.  I do however encourage you to use paper scraps that you have laying around your home.  For the wrapping shown here I stamped paper bags from Trader Joe's as well as scrap tissue paper and other tiny bits of paper I had saved up from random craft projects.

You will need:

For the Gift Tissue (shown in the main image) you will need:

  • Scraps of tissue paper (white or colored)
  • Scissors
  • Paint (I used acrylic, but you can try other options)
  • Celery stock base.  You will need to have cut this as smoothly as possible to leave a nice straight stamping surface)
  • Art tray or plate (basically just a flat surface that you can pour your paint onto)

For the Gift Tags:

  • All the supplies listed above + paper scraps such as paper grocery bags, patterned, lined or graph papers
  • Standard Hole Punch
  • Large craft punches in the sizes you wish
  • Twine, ribbon, or string.

Optional:

  • Jazz up your package with little treasures from around your home.  Buttons, beads, pinecones, mini animal figurines, etc... all have potential!
  • Create sturdier gift wrap using paper grocery bags (for small gifts) or kraft papers.
  • Don't forget to save the wrapping after your gifts have been unwrapped.  Even if it's been torn you can still create gift tags, etc from the leftovers!


Step 1)  Cut open a brown paper bag so that it lays relatively flat.  You can use either the printed side or the blank reverse (I used the printed in my example because I really loved the design). 
Step 2)  Put paint (any color you want) onto your tray/plate (you may need to brush it around so that it's not all in one lump).  Take your prepared celery stamp and dip it into your paint.  Check and be sure that it's fully coated.
Step 3)  Press your stamp down onto your paper with steady even pressure.  Be sure not to rock it from side to side or let it slide around.  Lift off your paper with a smooth motion.
Step 4)  Repeat as desired.  In the image I am stamping an area intended for gift tags, so I chose to make more than one print so that I could cut several tags from it.
Step 5)  Once your stamp has dried (if you're impatient like me, you can dry it with a hairdryer on a low setting) use craft punches to cut out your tags.  Punch at the top with a standard hole punch (so you can string twine through it later).
Step 6)  Using tissue paper or other gift wrap sized paper, repeat steps above until paper is covered in as many stamps as you like.  TIP: For tissue and other thin papers, be sure to place a scrap piece of paper beneath the sheet you are working on in case some of the paint comes through.  If you use more than one celery stock you can overlay colors for a really cool effect.
Step 7)  Allow paper to dry completely and then wrap up your gifts.
Step 8)  Embellish as you like!

This is also a great project to do with the kids in your life.  Always be sure to supervise, and take care when selecting your paint (you might want to pick something that is not permanent).  Whomever you create this with or for, have fun!

I'd love to see pictures of your finished packages!  If you'd like to share them with us leave a link to your masterpiece in the comment section below. xo Ez

Monday
Dec012008

Two Good Things


Faux Bois Parcel and Paper Snowflake Packages from Bugs and Fishes by Lupin (found via lolly-tots crafty goodness blog).  You can see more from Lupin on her BLOG and ETSY.

Learn how to create perfect paper snowflakes right here. Buy woodgrain contact paper right here (scroll down for more color options).

Thursday
Nov202008

D.I.Y. Eco-Happy Pom Pom Gift Topper

Last Holiday season I became obsessed with making yarn pom poms.  They are perfect as garlands, ornaments, gift toppers, and more! 
Today I am super excited to share a cool twist on the standard pom pom (I dreamt this up while driving the other day)... plastic grocery bag pom pom gift toppers


I know.... it sounds crazy.  But what better way to reuse something as benign as a grocery bag, then to give it new life by turning it into something fabulous for adorning your holiday gifts!

If you are not familiar with the basic steps to creating a pom pom, then first check out this short video I found on YouTube.  Disregard the scruffiness of the end result... and the fact that she is using yarn.  It is only the process that you will need to be familiar with.

Okay... here you go:

You will need: * 1 plastic grocery bag (per pom pom) * pair of sharp scissors * 5-10 minutes of free time *

Step 1. Lay your shopping bag flat and cut both handles off.  Set handles aside for later.  Cut the bottom off of your bag.  Cut just enough so that you are left with a tube of plastic (open at both ends).  Open your bag and cut down both of the side seams (this will create two squares of plastic).

Step 2. Starting at one edge, cut around your plastic square in a continuous line (as shown in the picture).  Don't worry about making it super straight or even.  Repeat with your second plastic square.  You will end up with two long strips of plastic (they will be all crooked... but that's okay).

Step 3.  Starting with one of the strips (I chose the white plastic first so that the red would stand out at the end.  Yours will look differently depending upon what your bag looks like), begin wrapping the plastic around four of your fingers using your thumb to keep it steady as you wrap it around. (see photo).  Repeat with your last plastic strip.

Step 4. Carefully tie one of the handles (that you cut off in step one), around the entire bundle of plastic securing with a double knot.  You may want to knot it more than one time.  The ends of the plastic handle that you used to tie your bundle with will be hanging loose.  Do not cut these.

Step 5.  Take your scissors (the sharper and pointier the better) and cut through the loops that were formed when you wrapped the plastic around your hand.  These might be hard to see and will probably be all bunched together at this point.  (if this step is not making sense, refer to the video I link to above.  It's easier to see with yarn).

Step 6 + 7. Once all the loops have been cut, grasp the two long ends (that you didn't cut because you followed the instruction above) in one of your hands.  Gently shake your pom pom to fluff it up a bit.  You can also use your other hand to re-arrange things to your liking.  You may like the untamed version at this point... which means you can stop now.  Or if you want something a little more groomed, begin cutting around your pom pom with your scissors (give it a haircut)... trimming any pieces that stick out or that make it lopsided.

Step 8. Once you have it trimmed to your liking you are done!  Yay!  You can tie pom poms to your gifts using the two long pieces that you left uncut.  Or trim the long ends and string a bunch of these together for a garland or attach them to a wreath form for some festive decor!

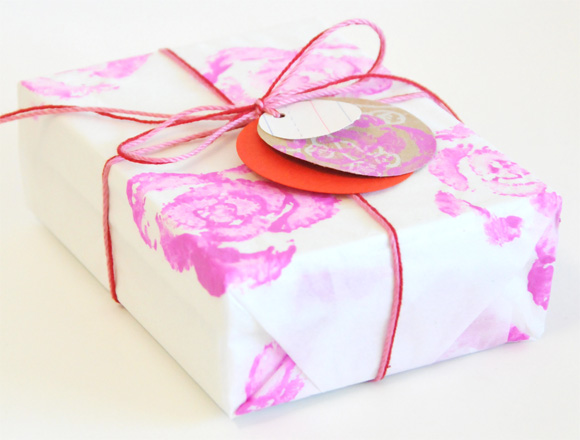
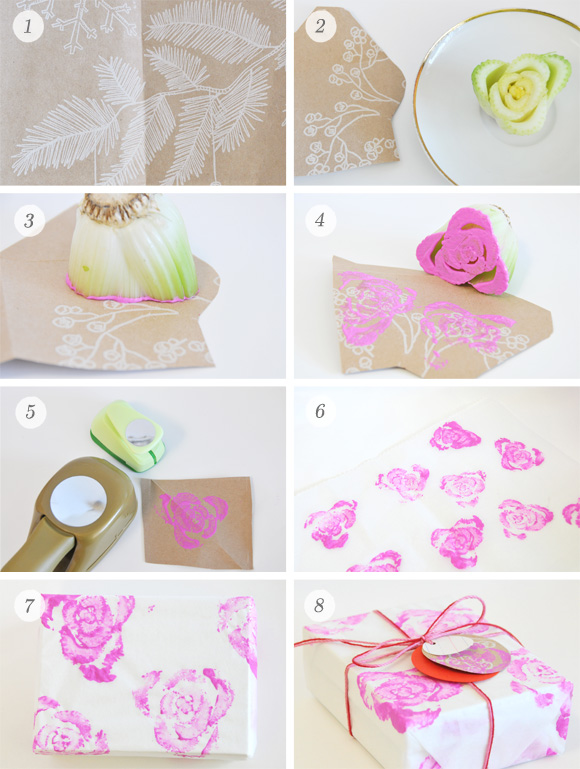
Eco-bonus: Try wrapping smaller gifts in the paper from brown grocery bags!

Coming up next... the first installment of the Creature Comforts' Holiday Gift Guide! xo Ez

Wednesday
Sep242008

Real Decor

{IMAGE ONE} White Paper Doilies & Orange Thumbtacks photographed - by citypix

The most important thing about home decor is that first word: "home."  My feeling is that your space should reflect who you are, what inspires and moves you... not just whatever trend is the latest and greatest (according to various monthly publications - not that there isn't much inspiration to be found with their pages... but you catch my drift). 

{IMAGE TWO} First Row: Inspirations displayed on clip boards by O!Rachew!, Polaroid-Heart - by Daydream Lily Second Row: Twine and Antlers become sculptural - by Knitalatte11, this Empty Frame against the wall brings unexpected drama to the room -  by Amy Nieto

All this being said, I know that decorating isn't easy, especially on a limited budget.  So today I've found a few brilliant ideas from Flickrites to hopefully inspire you to create something fabulous and personal in your home (be it an all out makeover or a simple hour long project).

{IMAGE THREE} Posies in a Glass Jar will always brighten any space - by Yvette Inufio

Related Posts Plugin for WordPress, Blogger...