Partners

Newsletter Sign-up


Lovely Sponsors


Currently Obsessed

Subscribe

Lovely Press

Disclaimer

From time to time Creature Comforts may include affiliate links to products featured in their posts and/or affiliate banner ads. However posts and featured products seen on Creature Comforts are never controlled or selected by advertisers or affiliates. Featured items are products that we personally like, and would share regardless of affiliate partnerships. If you choose to purchase an item that has been featured from an affiliate link or ad banner, we may receive a small commission on that sale.

Privacy Policy
Hosted by

Entries in Holiday Inspiration/Projects (136)

Tuesday
Feb052013

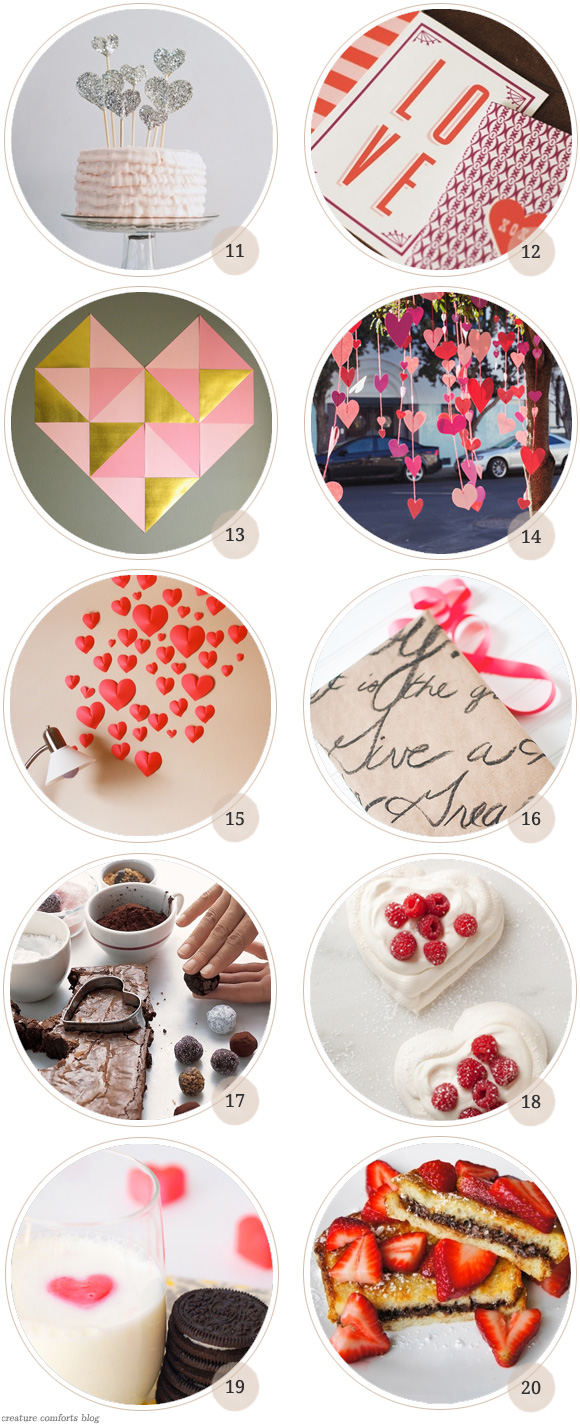
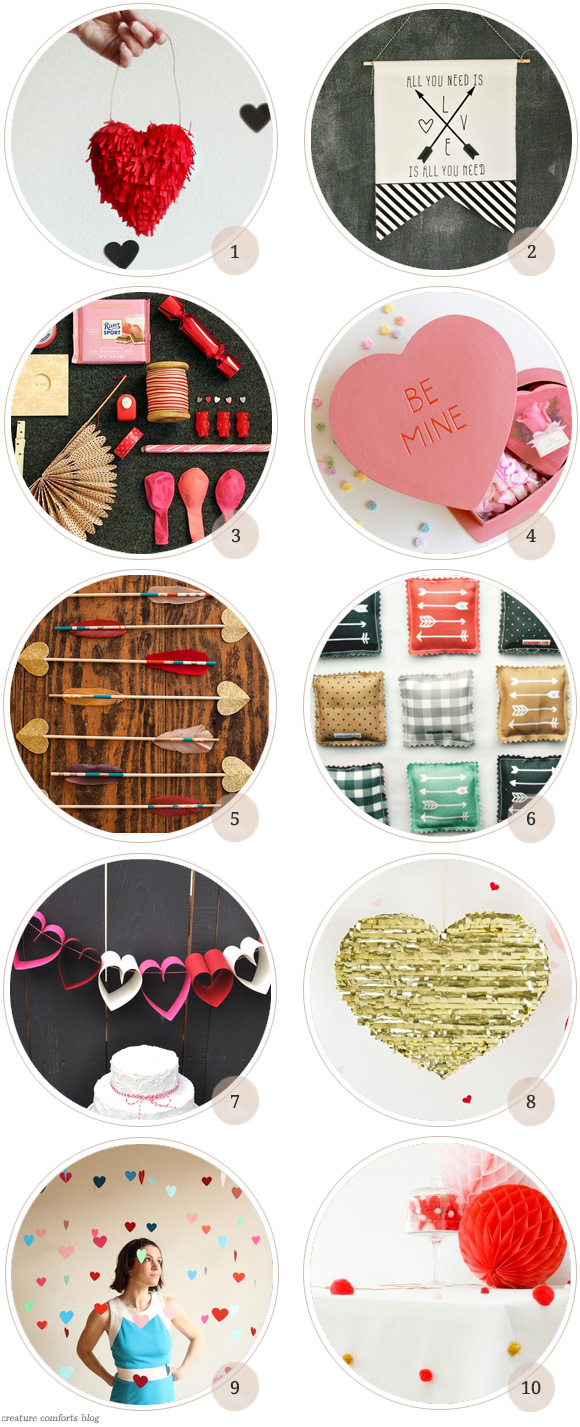
Pinterest Picks: 20 Valentine DIY Projects + Printables

Hello friends! It's Tuesday...so how about a heaping helping of sugary-sweet Valentine's Day inspiration?! Are you in? Even if you don't have plans to celebrate the day o' love, don't miss out on the tasty recipes that I included at the bottom of this roundup. The Nutella-stuffed French Toast is so good it should be illegal. I'm serious! xo Ez

1. DIY Fringed 3-D Heart (via) | 2. Fabric Arrow Banner DIY | 3. Valentine's Day in a Box (via) | 4. Send a Valentine's Day Care Package (via) | 5. DIY Love Struck Arrows (via) | 6. DIY Hand Warmers (via) | 7. DIY Paper Heart Garland (via) | 8. DIY Gold Mylar Heart Pinata (via) | 9. How to Make a Floating Heart Background | 10. DIY Pom Pom Tablecloth (via)

11. Glitter Heart Cake Topper (via) | 12. Free Printable Mini Valentines | 13. Giant Geometric Wall Heart (via) | 14. Tree Heart Installation (via) | 15. DIY Wall of 3-D Paper Hearts (via) | 16. DIY Love Letter Gift Wrap (via) | 17. Brownie Hearts & Brownie Bites (via) | 18. Chantilly Cream Pavlova Hearts (via) | 19. Heart Milk Cubes | 20. Nutella-stuffed French Toast with Fresh Strawberries (via) - I can personally vouch for this recipe. It is scrumptious!

Tuesday
Jan222013

Free: Love + Kisses Photoshop Brush Set

I look kind of funny in lipstick. No really, I'm not being mean to myself...just stating a fact. I think this unfortunate truth has something to do with my cartoonishly bowed top lip. The peaks are as pointed as mountain tops which isn't much of an issue in my standard clear lip gloss, but throw on anything with color and those points make me look like a lady who is trying just a tad too hard.

Even with this knowledge firmly planted in my mind, I was still lured in by the array of stunningly vibrant lipstick colors on display at Target last weekend. In my momentarily dazzled state I managed to convince myself that somehow in these new bolder shades, I would surely be transformed into a glam chick who rocks a magenta lip like nobody's business. Well, suffice to say, even though I ended up with three colors so pretty that I could cry, they, as predicted did nothing but draw a neon pink spotlight to my overly-arched kisser. Le sigh!

So while my dreams of breezing around Alt Summit with a color-saturated smile are all but gone, I decided that I could still make that lipstick worth something. Behold the Free Love + Kisses Photoshop Brush Set (download using the button above)! There are two lip prints and several different love-themed words and phrases in the set for good measure. And since they are photoshop brushes, that means you can use them with any color you fancy (they don't have to be shades of pink and red like mine here). Use the set to spice up a love note, smother a Valentine-themed blog post with, etc. etc. I'd love to hear what you make out of them! xo Ez

P.S. I'll be leaving for Alt Summit early tomorrow morning. If you'd like you can follow me and my adventures over on instagram (creaturecomforts) and Twitter (creaturecomfort). I'll see you here for regular posting next week! xx

Photoshop Brushes Tip 1: The lip prints are slightly transparent (it makes them look cool layered over other things)...but if you want them to look darker just click your mouse 3 or more times in one spot to build up the color and make them less transparent.

Photoshop Brushes Tip 2: If you'd like a little help on loading and using photoshop brushes, you can watch my video tutorial: Basic Tips for Using Photoshop Brushes that I created last year. *You can find the Inky Brush Set used in the video right here.

Note: I use Photoshop CS3 and I'm unsure of how these brushes will work with older versions of Photoshop. Fingers crossed that they will work for you.

Monday
Dec172012

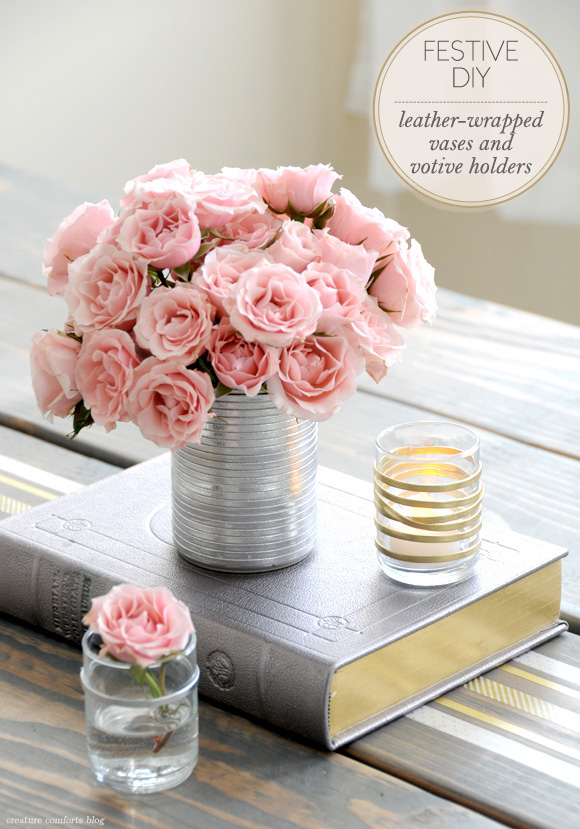
DIY Leather-wrapped Vases and Votive Holders

Hello lovelies! Today I'm back for another fun DIY that I created in partnership with my friends at Waverly. This time I thought it would be nice to create some table decor that will look just as lovely at a festive party this season, as it will in-use all year 'round.

Let's make some easy DIY leather-wrapped vases and votive holders!

DIY Leather-Wrapped Votive Holders

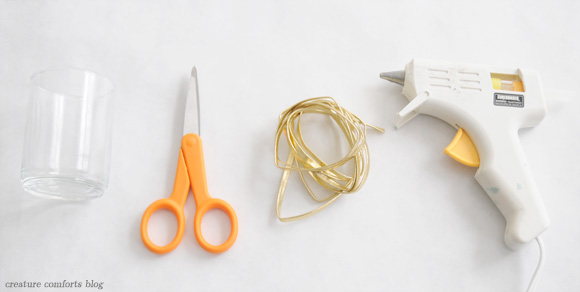
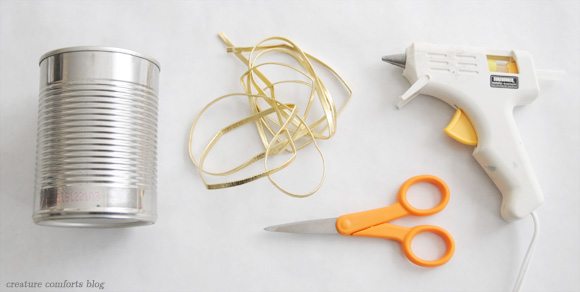
Gather your supplies. You will need:

  • Small glass votive holder(s) | The variety used here were purchased at Michael's
  • Sharp craft scissors
  • Realeather Craft Lace in Metallic Gold and / or Silver | Available at Michael's and Hobby Lobby (find additional suppliers here). Be sure that your leather cord has two flat sides (like a fettuccini noodle...not round like a spaghetti noodle).
  • Hot glue gun (low heat) and glue stick(s)
  • Battery-operated candles

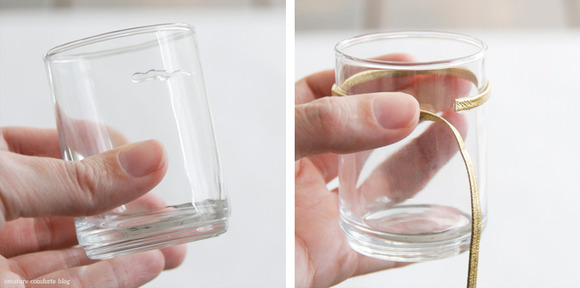
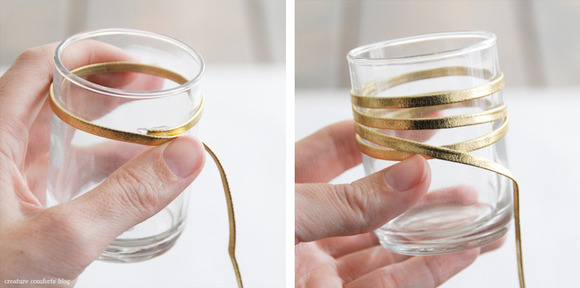
Plug in your glue gun and allow it to get hot. Begin by squeezing a small line of glue somewhere within the top 1/3 of your votive holder. Immediately place one end of your leather down into the glue and press to adhere. If the glue dries too quickly, you can easily peel it off the glass and try again.

Once the end is glued in place, wrap your leather cord around the top of your votive holder until it meets back at the starting point.

Squeeze a drop of glue on top of the end of your cord (where you first started) and lay the loose end of your cord through it. Be sure that you have pulled the cord taught so that it is not drooping. Once this dot of glue has hardened (it should take just a few seconds) continue wrapping your cord around your votive holder.

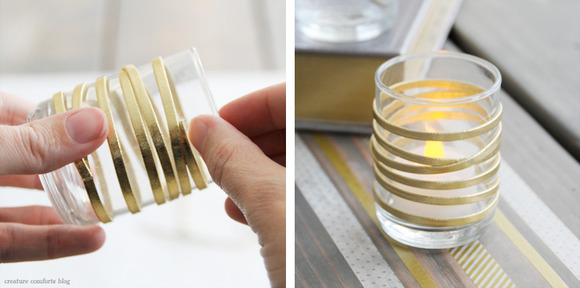
You can keep your lines parallel or overlap them like I did here. If you want to create the overlapped look, just be sure to add a dab of glue under the cord anytime you will have two pieces laying on top of one another. Keep your cord nice and tight while you work.

When you get to a good stopping point, add a dot of glue on top of a portion of leather that is already wrapped around the votive holder, and lay the end of your cord through it to adhere. Use a pair of scissors to trim off any excess cord. If there are any bits of dried glue on your votive holder, you can use your fingernail or the tip of your scissors to carefully peel it off. Place a battery-operated candle in your new holder, and you're done!

Now on to creating a pretty DIY Leather-Wrapped Vases!

Gather your supplies. You will need:

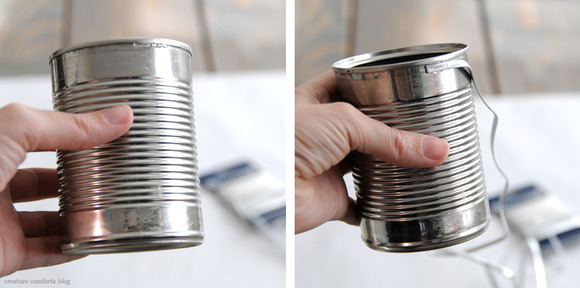
  • Tin can(s), emptied, cleaned, and dried | Make sure to use the variety with the pull-off top so that you are not left with any sharp edges. You can also use a glass cup in place of the can if you prefer.
  • Sharp craft scissors
  • Realeather Craft Lace in Metallic Gold and / or Silver | Available at Michael's and Hobby Lobby (find additional suppliers here). Be sure that your leather cord has two flat sides (like a fettuccini noodle...not round like a spaghetti noodle).
  • Hot glue gun (low heat) and glue stick(s)
  • Fresh flowers (and water)

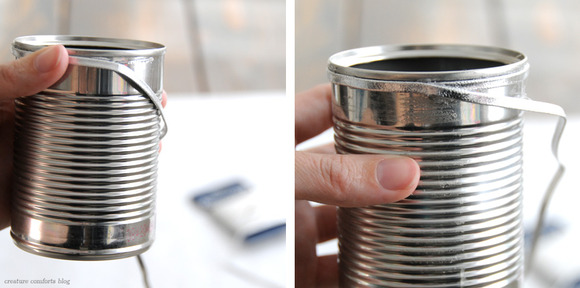
Plug in your glue gun and allow it to get hot. Begin by squeezing a small line of glue beneath the top lip of your can. Immediately place one loose end of your leather cord into the glue and press down to adhere. If the glue dries to quickly you can easily peel it off and try again.

Now apply another short line of glue just slightly below the top lip of your can, and directly following the portion of cord that is already attached. Don't place the glue too close to the edge or you will have a messy vase top. Place your leather cord into the hot glue, making sure to pull your cord tight as you are working so that there is no slack in the cord. Continue to work in small sections, adding glue, and placing leather cord, until you have made your way back to your starting point.

Now add a small dot of glue on top of the cord end (where you started) and overlap the loose end of your leather cord over it, angling it down slightly (as seen in the photo).

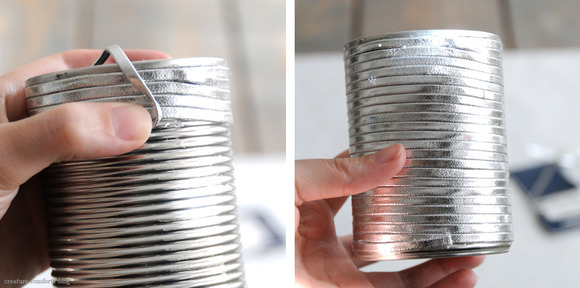
Continue to wrap your leather cord around your can, keeping the cord taught as you work, and the top edge of your cord snug against the bottom line of the cord above it. You will not need to glue the cord down along every row. If you'd like to apply a small dab of glue every few rows to make it extra secure, you can. The very top row is the only one that need to be glued down completely.

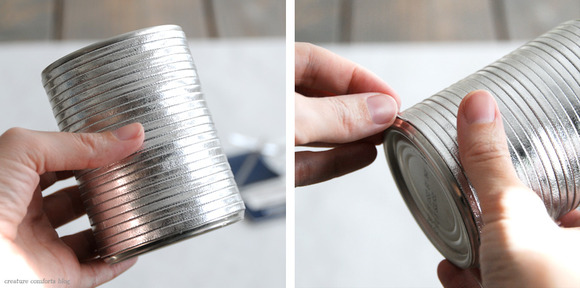
Continue wrapping cord around your can until it is completely covered. Glue the loose end atop the last wrapped row and snip off excess cord. You'll see that the leather on the back of the can angles down just a bit (nobody will notice when there are flowers inside it)...

...but the front is nice and straight.

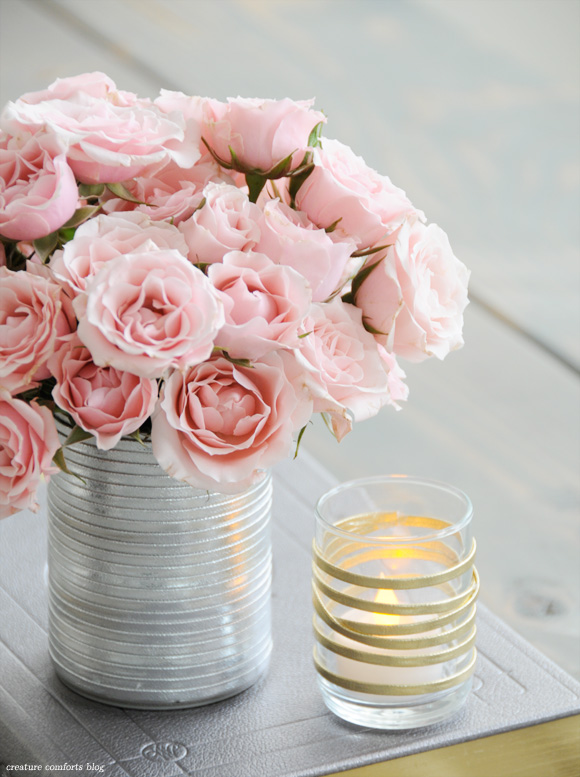
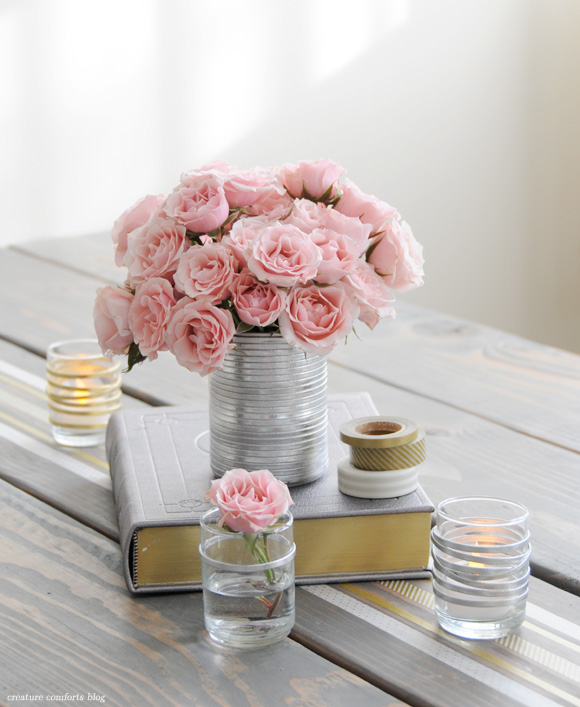
Use your fingernail or the tip of your scissors to carefully remove any excess glue along the edges. Fill with water (carefully so it doesn't leak on the leather) and a bouquet of beautiful blooms!

Doesn't it look lovely?!

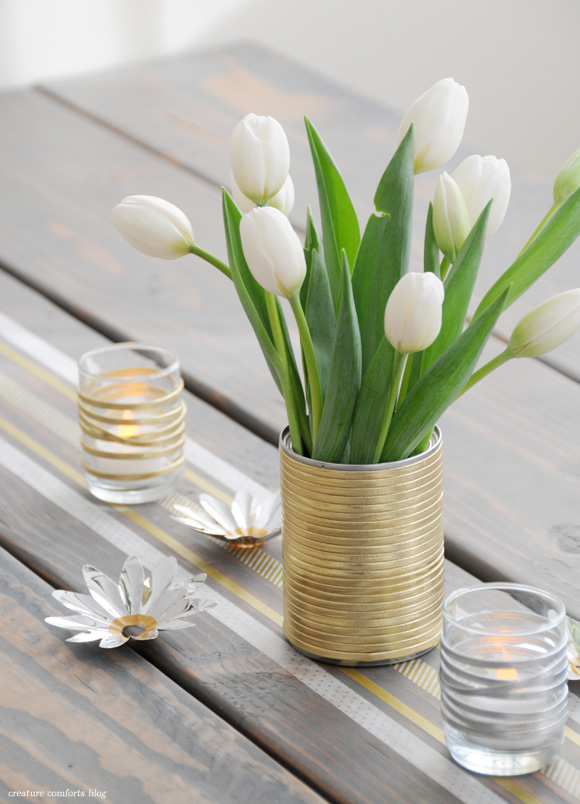
And here it is in gold!

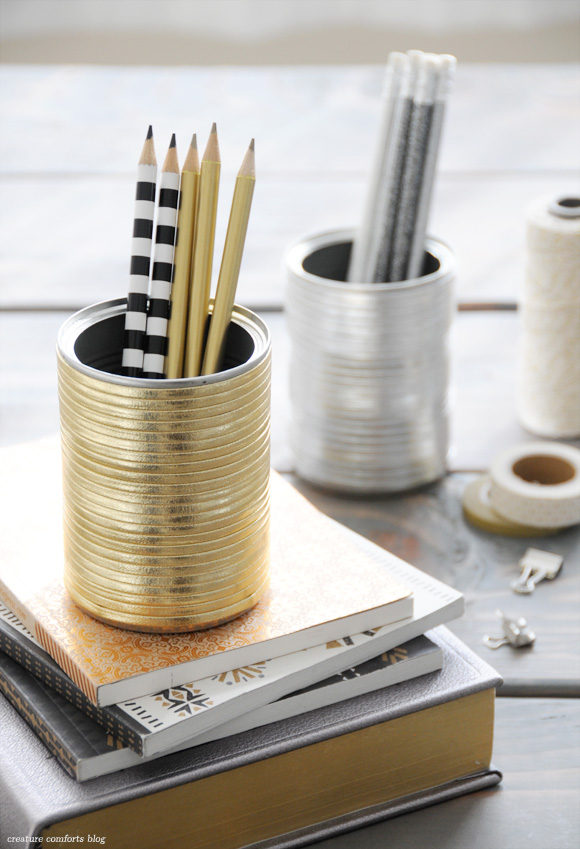
Bonus...these vases can also double as snazzy pencil holders! I have the gold one on my desk right now!

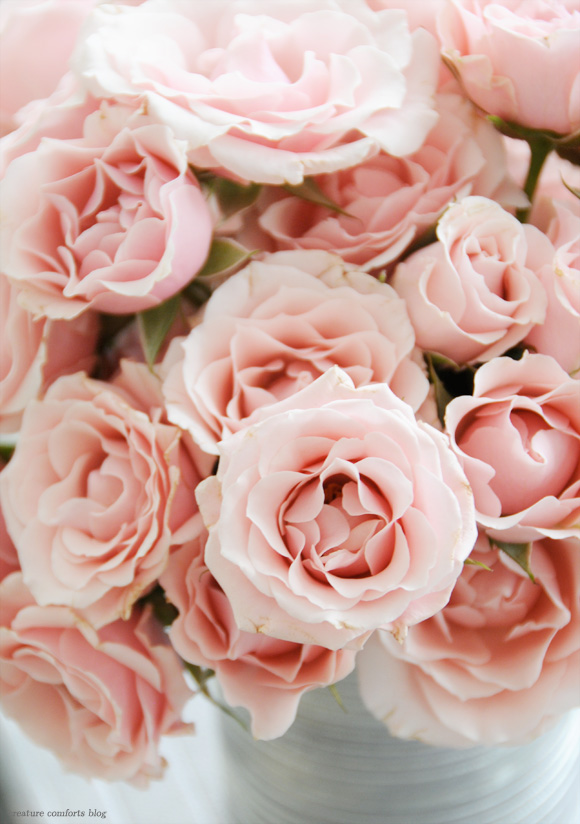
And one last gratuitous rose photo...because I just can't help myself. xo Ez

Prop sources: Pencils - Target | Journals - Delphine Press (from a trade show), Sparrow & Co. | Silver Dictionary - received as a gift | Japanese Masking Tape - etsy | Metallic Flowers - vintage Christmas decor | 

---------

This post was kindly sponsored by Waverly. Follow them on TwitterPinterest, and like them on Facebook. The DIY content, images, and opinions shared in this post are my own.

Friday
Dec142012

DIY Festive Wooden Trees


Hi friends! I'm back today with another fun holiday project that I created in partnership with Waverly: Festive Wooden Trees! I first made these trees to decorate my home a couple holiday seasons ago (you might have also spotted them over on my Instagram a few weeks ago), and have always intended to share a tutorial with you here (better late than never, right).

Even though this project involves the use of a craft knife (I know that can be intimidating) it is actually pretty easy to create...just a few straight cuts, glue, and you have a nice bit of modern holiday decor for your home! Let's get crafty!

Supplies needed:

  1. Balsa wood - 1/16 x 4 x 24 in. | Balsa wood can be found in an assortment of sizes in the woodcraft isle of craft stores. I purchased mine at Michael's.
  2. Craft glue | I highly recommend Aleen's Original Tacky Glue (found in craft stores) for this project. I tried several glues, and this one worked the best.
  3. Pencil
  4. Craft knife with a sharp blade
  5. Ruler
  6. Self-healing mat with ruled lines | Available at fabric and craft stores

TIP: Click on the tutorial images below to see an enlarged view in a new window.

Gather your supplies.

Place your wood down onto your self-healing mat, aligning it with the mat's ruled lines. Determine the height that you'd like for your tree. I chose 5" for this one, so I'll use that measurement in my description. Place your ruler across your board at the 5" point and hold firmly in place. Use your craft knife to cut along the 5" line using the ruler as your guide. Use steady firm pressure. You will need to make several cuts before you will pass through the board, so don't worry if it doesn't go through with the first cut.

Once your rectangular portion has been cut, align it with the ruled lines on your mat again.

Next we need to find the center of the board. Since the board I purchased is 4" wide, we will note that the center falls at 2" in (if your board is a different width you will need to find the center of it by measuring). Place your ruler first at the bottom left corner of your board, and then up to the 2" center measurement (as noted in red). 

Once again use your ruler as your guide to cut along this measurement with firm downward pressure. Use slow steady cuts until you've made it through the board. Remove the skinny triangular-shaped piece that you just cut off, and set it to the side.

Now repeat the measuring steps on the right-hand side of your board. First place your ruler at the bottom right-hand corner and make sure the ruler then passes through the 2" center line. If you are using a clear ruler, you will see that you have a large triangle-shape beneath your ruler (as seen above). That means you're doing it right! Cut along the edge of the ruler to remove the second skinny triangular-piece.

You should now have three triangular pieces: 2 narrow and 1 wide.

So that they will fit onto your tree more seamlessly, you will want to cut away the tips of the two smaller triangular pieces. I placed the pieces  together (forming a larger triangle) and just trimmed off the top using my craft knife and firm downward pressure.

Align your large triangle with the mat's ruled lines and use a ruler and pencil to mark a light guide line down the center. Flip the triangle over and make the same mark down the center of this side.

You should now have 1 large triangle with markings down the center of both sides, and 2 smaller triangles.

Squeeze a small line of glue along the pencil line on one side of your large triangle.

Take one of your small triangles and embed the long edge of it into the glue line.

It is very important to make sure that the bottom edges are aligned (seen in the photo above) and that the smaller triangle is not overhanging the edge. If this happens you will end up with a wobbly tree. If it is not aligned, just move the boards around until they are in the position you'd like them to be. Use gentle downward pressure on the top edge of the smaller board to make sure that it is properly set into the glue. 

At this point you can use your fingertip (or a q-tip) to wipe away any excess glue.

Lay your glued boards to the side to allow the glue to set (it shouldn't take too long). You can work on creating additional trees while you are waiting, or go make yourself a cup of peppermint hot cocoa! Yum!

Once the first side has set, repeat the gluing process with the second side. Set it aside to dry completely (you can leave it standing upright).

If you want to get extra crafty, you can make a fuller tree! First make the basic tree (explained above) and then add 4 extra pieces. You will do this by cutting a board using the same measurements as used on the original tree. Just be sure to cut the larger triangle in half (so that it forms two triangles), so that you are left with 4 tall triangles to add to your basic tree.

Arrange them in your home and enjoy!

If the plain wood doesn't suit your holiday decor, there are endless ways that you can customize these trees to your liking. Here are a few ideas:

  • Paint them with standard paint or chalkboard paint
  • Dust trees with glitter
  • Adorn the top of each tree with a pom pom
  • Add "ornaments" by gluing on pretty beads or sequins

Have fun and make merry! xo Ez

--------

This post was kindly sponsored by Waverly. Follow them on Twitter, Pinterest, and like them on Facebook. The DIY content, images, and opinions shared in this post are my own.
Wednesday
Dec122012

Free Holiday Printables Roundup for 2012

1. Free Illistrated Holiday Gift Tags by Kelli Murray

Tis the season for printable gift tags and other festive freebies offered by some of our favorite creatives online. Lucky us! Here are a few of my favorites from around the web. If you know of any great designs that I missed here I'd love for you to share a link with us in the commet section below. The more the merrier!

For more amazing tags, check out last year's Free Printable Holiday '11 Gift Tag Roundup. xo Ez

PRINTABLE GIFT TAGS:

2. Free Holiday Greeting Tag with Pocket from Eat Drink Chic (via)

3. Free Christmas Gift Tags with Hand Drawn Calligraphy by Sweet Muffin Suite (via)

4. Free Holiday Tags designed by K.Becca for The Gifted Blog (via)

5. Free Monogram Christmas Tags from Making it Lovely (via)

6. Free Ugly Holiday Sweater Gift Tags with Free Customizable Holiday Card from Love vs. Design

7. Free Printable Monogram Gift Tags (available in 4 color choices) created by Sarah Khandjian for How About Orange

8. Free Printable Holiday Tags with Star Charm DIY by Jenn of Ambrosia Creative for Dot Coms for Moms (via)

9. Free Chalkboard-Style Printable Gift Tags with hand-lettering/illustration by Emily McDowel | from Poppytalk

10. Free Mercantile-Inspired Tags designed by Design Editor for The Tomkat Studio (via)

11. Free Holiday Tag Printables by David Saracino for Design*Sponge

12. Free Printable Tag Sets (three themes to choose from) by Ellinee (tons of holiday freebies available on her site)

13. And don't miss out on the Free Illustrated Gift Tags I shared here on Creature Comforts earlier this week!

PRINTABLE GIFT WRAP:

14. Printable Typographic Holiday Wrap by Jeanne Ciasullo for Sarasota Magazine (via)

15. Printable Watercolor Gift Wrap & Tag Set from Style Me Pretty | Photography: White Loft Studio / Design and Styling: Style Me Pretty (via)

16. Free Woodland Gift Wrap by Ellinee (tons of holiday freebies available on her site)

Related Posts Plugin for WordPress, Blogger...