Partners

Newsletter Sign-up


Lovely Sponsors


Currently Obsessed

Subscribe

Lovely Press

Disclaimer

From time to time Creature Comforts may include affiliate links to products featured in their posts and/or affiliate banner ads. However posts and featured products seen on Creature Comforts are never controlled or selected by advertisers or affiliates. Featured items are products that we personally like, and would share regardless of affiliate partnerships. If you choose to purchase an item that has been featured from an affiliate link or ad banner, we may receive a small commission on that sale.

Privacy Policy
Hosted by

Entries from December 1, 2009 - December 31, 2009

Tuesday
Dec152009

Inspiration Daily: 12. 15. 09

Monday
Dec142009

D.I.Y. Mossy Holiday Display

Hello lovelies!  I hope you all had a great weekend.  Today for our 18 Days Series we have a wonderful project put together by Cori of Cori Kindred.  Here's more from Cori on the simple how-tos for creating this fun Holiday decoration:

-----------------

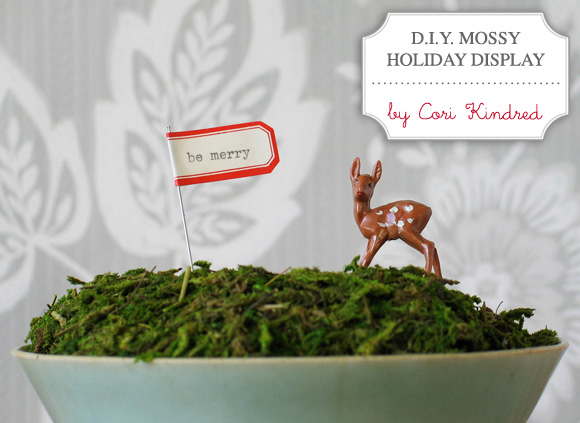
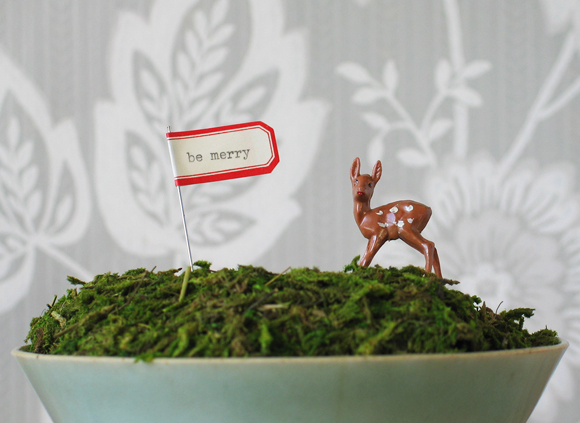
This little holiday display has pretty much everything I love in it: lush moss, a pretty vintage dish, lovely vintage paper and a tiny little fawn.  Plus it's super easy and ridiculously cute!

Here's what you'll need:

  • A bowl or dish
  • Small block of floral foam
  • Knife
  • Glue (I like to use clear caulk)
  • Scissors
  • Moss (I used supermoss preserved sheet moss purchased at joann fabrics)
  • Wire or toothpick
  • Label (vintage or handmade)
  • Little animal (I have vintage fawns for sale in my mushroom & moss vintage etsy shop)

Step 1: cut a block of floral foam that goes just a little bit higher than the dish you're using:

Step 2:  cut down the edges and cut little wedges to fill in the gaps.  glue foam pieces together and to the dish:

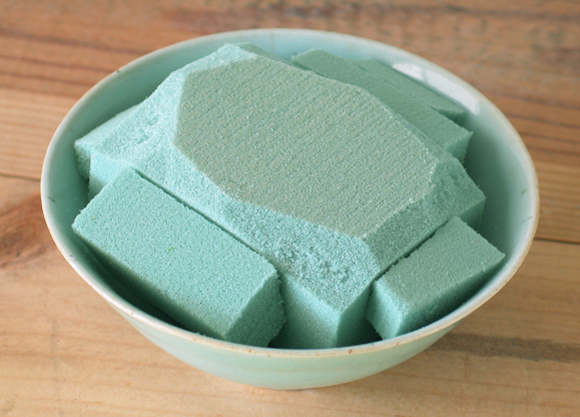
Step 3: cut out a square of moss a little bigger than your dish.  apply glue to the top of the foam.  while pressing the moss to the foam cut the moss a tiny bit smaller than the dish, and press down.  fill in any gaps with little pieces of moss:

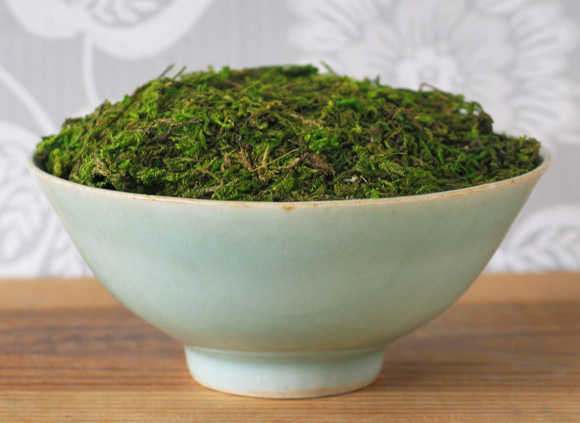
Step 4: type or write on your label, and glue to the wire.  insert it into the moss and add your tiny animal.  yay!  so cute:


Thank you so much for sharing this adorable project with us Cori!  You can see more from Cori on her:
WEBSITE  |  BLOG  |  VINTAGE SHOP  |  PRINTS SHOP  |  FLICKR

Monday
Dec142009

D.I.Y. Printable Holiday Chain Garland

Over the weekend I spotted this fun Holiday Chain Garland printable download/d.i.y. over on WhipUp.  I love the button patterns best of all (above), but they are all fabulous.  For the downloads and simple instructions head on over to WhipUp post.  xo Ez

Monday
Dec142009

Inspiration Daily: 12. 14. 09

Image credits: 1. Untitled, 2. don't forget

Friday
Dec112009

Printable 2010 Pocket Calendar by Sam & Cheryl

Hello everyone and happy Friday!  I hope you have a fun and relaxing weekend planned.  For today's installment of our 18 Days Series, Sam & Cheryl of To Have and To Hold have designed this awesome printable pocket Calendar for us.  I love the idea of printing this out and giving it as a gift!  Read on for downloads and directions from Cheryl & Sam:

We are so happy to share a tutorial on making wonderfully functional pocket calendars. These calendars are not only cute, but can hold your everyday ephemera such as receipts, notes and business cards. These are very simple to create and can be customized to make great gifts.

Supplies needed:

  • Letter-sized cardstock or premium heavy-weight paper
  • Double-sided tape
  • Craft knife (always cut with caution on a self-healing mat or other protected work surface)
  • Non-slip ruler
  • Bone folder

Downloads:

Directions:

  • Print the first page of the PDF pocket calendar on paper of your choice. The template will have the numbers upside-down. Make sure to print at 100%.
  • Feed the printed page back into your printer to print on the back side. Different printers will feed paper differently, but just use the instructions that indicate the top to make sure the two sides are correctly printed.
  • Using your cutting knife and ruler, carefully cut along the faint line on the template. (Tip: To make sure you don't cut into the calendar, you can use a pushpin to punch tiny holes at the corners, so that when your knife reaches it, you will feel a bump and know to stop cutting).
  • Flip the template over. With a bone folder and ruler, score along the three fold lines on the side with the illustrations. This will help make it easier for you to fold. (Tip: If you don't have a bone folder, a used ball-point pen with no ink will also help score a clean groove for easier folding).
  • Fold the side flaps inwards, and add double sided tape. Carefully fold the calendar flap down to create a secure pocket.
  • Repeat for all months of the year.

Additional ideas:

  • Measure 2.5" to the centre on the top, and use a hand-held punch to create a hole for hanging the pocket calendars. Use a pushpin to place it to a wall or cork board, or decorate with different kind of ribbons to give the calendars more personality.
  • To really bring out the different characteristics of the months, you can use various textures and colours of paper.
  • Cut a photograph and attach it with double-sided tape to create a personal photo calendar as a gift. The pocket can hold messages or tiny reminders throughout the year. If you choose to attach a photograph, do not print the illustrations on the back side of the calendar.
  • Write personal messages on the top of the pocket calendars next to the illustrations. This will really personalize your gift!
  • Use a round corner cutter to add a nice finish to the top corners.

The template is very basic, so have fun and make some pretty pocket calendars for 2010.
Enjoy, Sam & Cheryl

Thanks so much for sharing this fabulous download with us Sam & Cheryl!  To see more from these two lovely ladies, visit:

BLOG  |  TWITTER

Page 1 ... 4 5 6 7 8 ... 11 Next 5 Entries »
Related Posts Plugin for WordPress, Blogger...