Partners

Newsletter Sign-up


Lovely Sponsors


Currently Obsessed

Subscribe

Lovely Press

Disclaimer

From time to time Creature Comforts may include affiliate links to products featured in their posts and/or affiliate banner ads. However posts and featured products seen on Creature Comforts are never controlled or selected by advertisers or affiliates. Featured items are products that we personally like, and would share regardless of affiliate partnerships. If you choose to purchase an item that has been featured from an affiliate link or ad banner, we may receive a small commission on that sale.

Privacy Policy
Hosted by

Entries in Gift Giving / Wrapping Ideas (150)

Tuesday
Jan082013

DIY Faux Polaroid Coasters from Darkroom and Dearly

Hi friends! I want to thank you all so much for your amazing support and encouragement yesterday. It's always scary to share something personal online, but every time I have over the years I have quickly been reminded of how incredibly lucky I am to be surrounded by such an amazing community of genuinely kind and inspiring individuals such as you. Thank you, thank you, thank you!

In any event, I'm not quite on top of things enough to have a new Creature Comforts DIY post done already, but luckily I came across these amazing DIY Faux Polaroid Coasters on Darkroom and Dearly a while back, and I think they are just the thing to share today. This finished project would make a wonderful gift (even more so if the gift recipient is a photo enthusiast), and I absolutely love how easily they can be customized to suit just about any one (i.e. photos of the grandkids for nana, shots of the seashore for your land-locked friend, etc.). Pop over to Darkroom and Dearly for the full DIY. xo Ez

Thursday
Dec132012

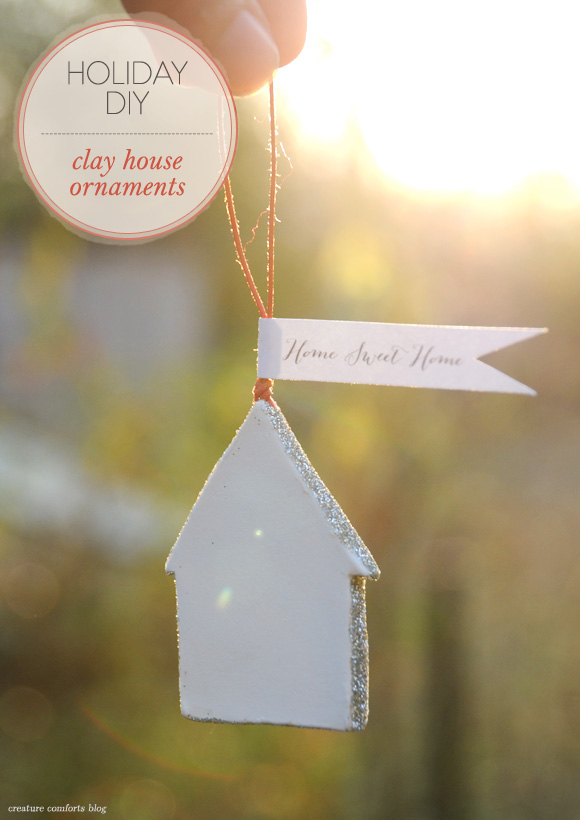
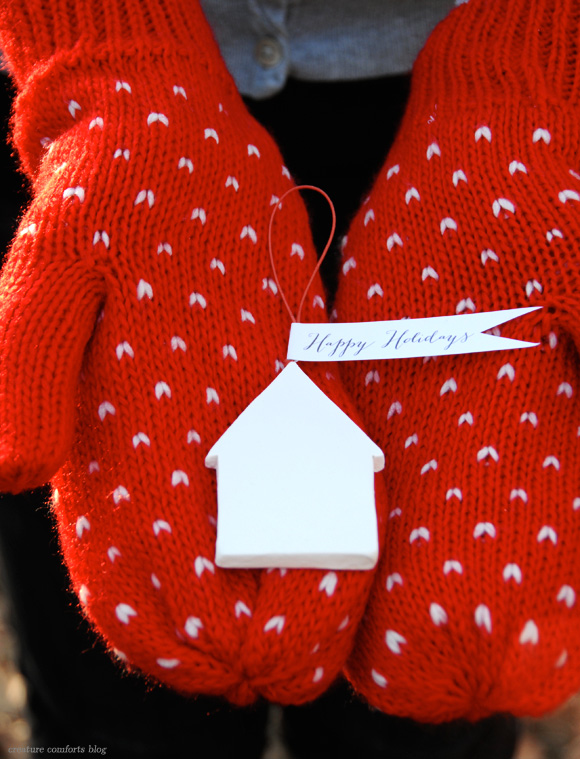
DIY: Simple Neighborly Clay House Ornament Gifts

Hi friends! I'm back for my second neighborly-inspired project (here is my first one), in partnership with Vivint and their blog The Neighborhood.

But first before we dive into this fun project I want to quickly remind you all that today is the final day to enter for your chance to win a free admission ticket to attend Alt Summit 2013. Jump on over and enter...you can submit as many entries as you'd like to increase your chances. I hope I'll be seeing you there!

Okay, now on to the house-making!

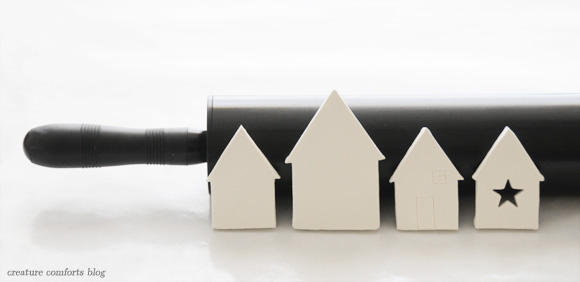
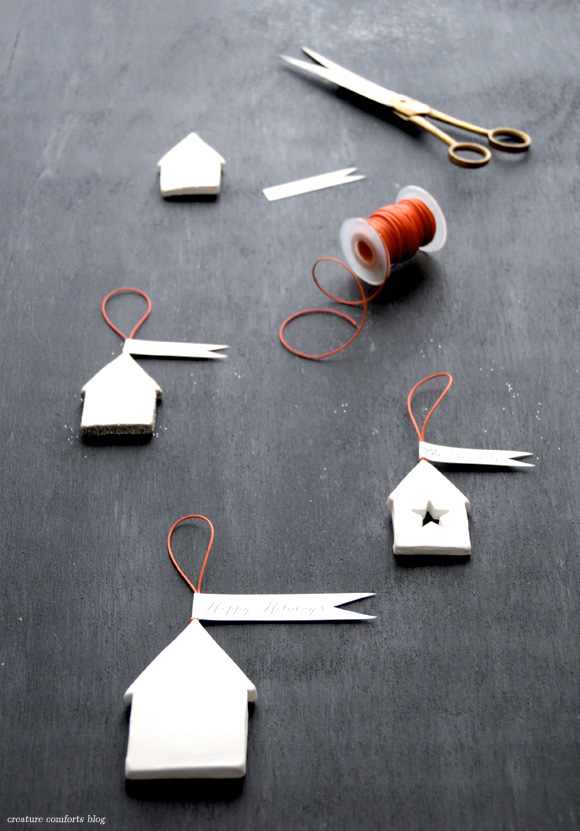
This project is pretty simple to create. You could easily make an entire neighborhood of houses without too much effort.

Tip: I recommend storing your extra clay in an air-tight container while you work so that it doesn't dry out and you can use it again for other projects (such as my DIY Lollipop Ornaments, Scandinavian Inspired Star Garland, Nursery Mobile / Wall Hanging, or Easy Geometric Gem Mobile). Can you tell that I like this type of clay?!

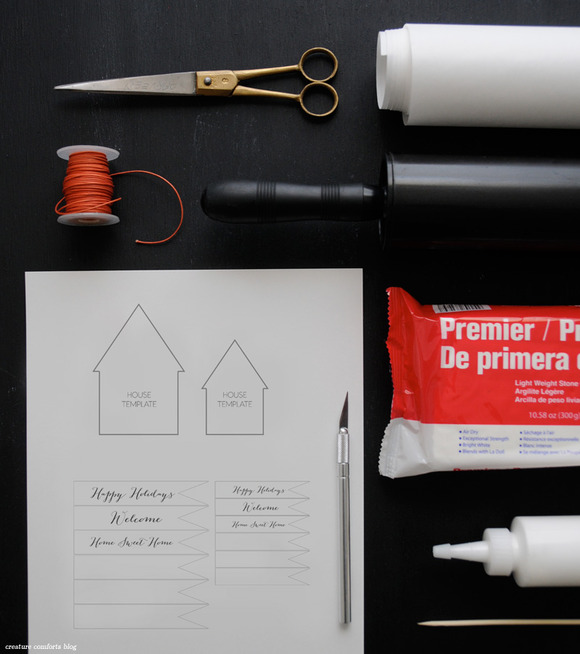
Supplies needed:

  • House + Flag Template - Download using the button below | printed onto heavy-weight paper
  • Premier Stone Clay by LaDoll - available at craft stores such as Michael's or online | You can also use oven-bake clay for this project if you'd prefer (although I don't cover the baking step in this tutorial)
  • Craft knife
  • Craft scissors
  • Twine | I recommend something that is sturdy but not overly thick
  • Freezer paper or waxed paper to protect your work area
  • Rolling pin (I use a non-stick version. I'm not sure how a standard one will work)
  • Glue | I highly recommend Aleen's Original Tacky Glue for this project (found at craft stores)
  • Bamboo skewer

Optional items for customization:

  • Fine glitter | I used Martha Stewart's glitter in "white gold" (purchased at Michael's)
  • Paintbrush
  • Tiny star-shaped cookie cutter | You can usually find these sold in a set in the baking isle of craft stores

Tip: You can see the tutorial steps at an enlerged size by clicking on each image.

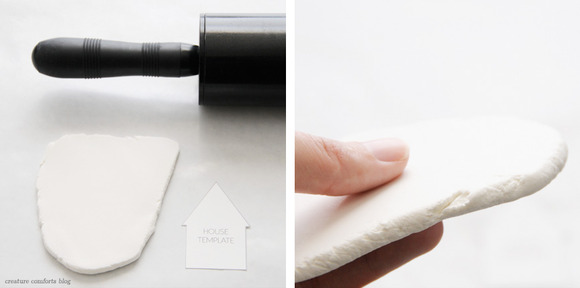
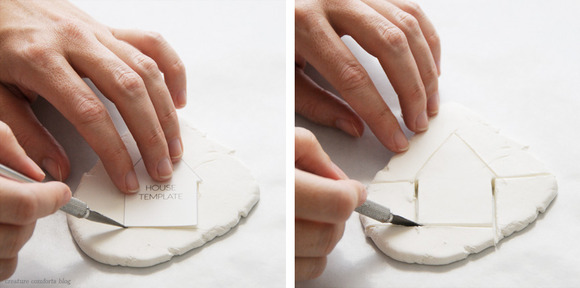
Cut out the house template you'd like to use (there are two size options available on the printable file), then begin by protecting your work surface with a piece of freezer paper (waxed side up) or waxed paper. Take a golf ball sized portion of clay (or larger if needed) and begin rolling it out using your rolling pin. Make sure that the flattened shape is is both wide and long enough to fit the house template you will be using. The finished thickness of your rolled clay should be about 1/4."

Place your template on top of your prepared clay and use the tip of your craft knife to lightly trace around the outer edges of your template. The goal is not to cut all the way through the clay, but to give yourself a guide for the next step. Once you've traced your house shape with your blade, begin cutting out your house. This is best accomplished by cutting straight lines all the way along each flat edge until your blade passes through the edge of your clay. This will remove clay in smaller sections and will give you the cleanest edges on your house. Tip: If you are worried about cutting into your work surface, I recommend working on top of a cutting board or self-healing mat.

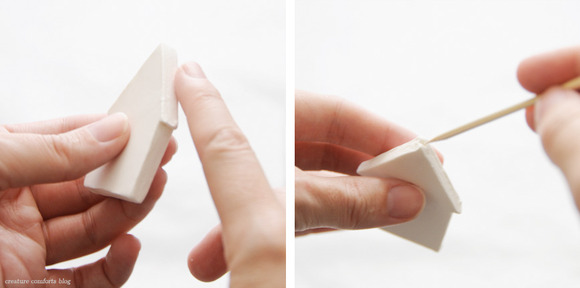
Use your finger to smooth out any roughness on the edges or surface of your house. It can sometimes help to add a dab of water to your fingertip during the smoothing step. Once your shape is nice and smooth, use the sharp end of a skewer to press a hole into the center of the top point of of your house. The impression doesn't need to be too deep. This is where you will be gluing your twine for hanging.

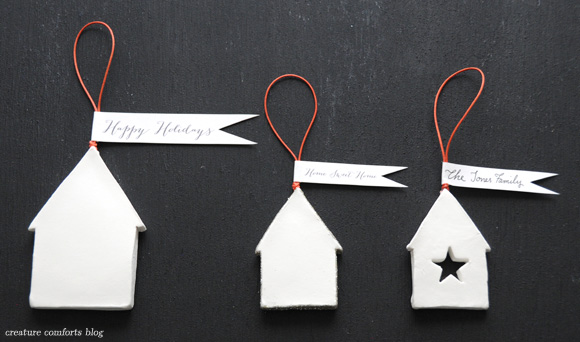
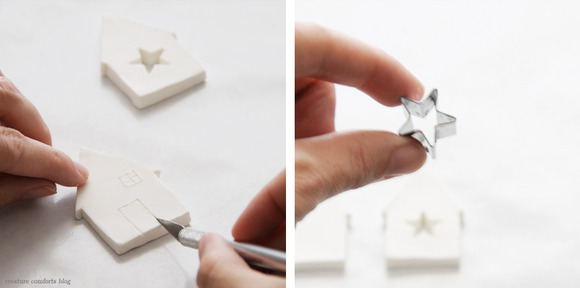
While the clay is wet you may wish to add additional decorative touches to your house. In the first example I used my craft knife to very gently create the outline of a door and window. In the second, I used a small star cookie cutter to punch a design out of the center. If you would like to glitter your ornament, you will need to wait until the design is dry to do so (keep reading below).

Cut out as many house shapes as you'd like to make and lean them gently against a surface to air-dry. The drying process takes several hours, but I recommend letting them dry overnight for best results. If you are able to rotate the shapes half-way through the drying process so that the more damp side is facing out, they will dry more quickly.

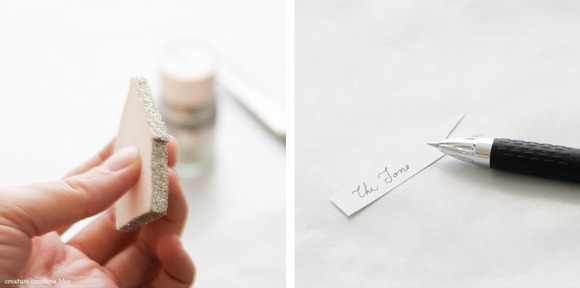
Once your houses are dry you can use them as is, or embellish with glitter. To glitter the edges of your dry house like I have here, apply glue along the edges using a paintbrush. Sprinkle glued area generously with glitter. I recommend working over a piece of scrap paper to make clean up easy, and so you can reserve the excess glitter. Tap your ornament to remove excess glitter and allow the glue/glitter to dry. Next, cut out the pennant flags that you'd like to use on your house. Blank tags are included incase you'd like to write your own message. Leave at least 1/4" of blank space on the flat side of the tag if you are writing your own message.

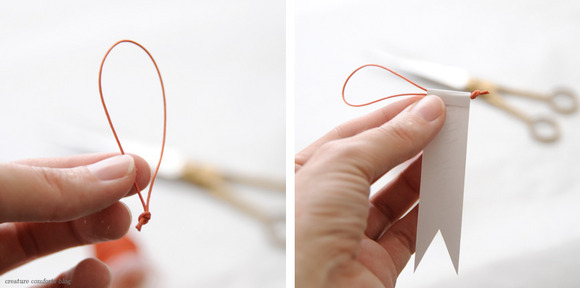
Create a loop for hanging. Select the length of twine you'd like and tie the two ends together. Be sure to leave a small tail of twine beneath your knot. This will come in handy when attaching it to your ornament. If you'll be including a paper flag, apply a small amount of glue to the backside edge (the side without the message) of the paper. Sandwich the bottom of the loop inside the end of the flag, folding over just enough of the paper so that it seals around the twine. Press firmly for a few seconds to make sure that it adheres. Allow glue to set.

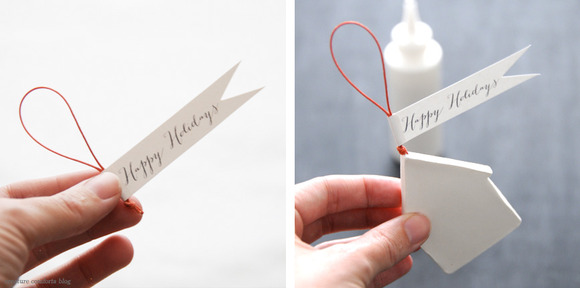
Once your tag is dry, apply a small bead of glue into the hole that you made at the top of your house ornament. Take your twine loop and place the ends into the hole until they are embedded and glued in place. Make sure your flag is facing the right direction (rotate the loop as needed to adjust). Allow the glue to fully dry.

Give your beautiful handmade ornaments as gifts to your neighbors and loved ones. Bonus: these ornaments would also make a thoughtful housewarming gift at any time of the year. An ornament flying the "Home Sweet Home" flag would look lovely hung in an entryway all year 'round!

Happy holidays friends! xo Ez

--------

This post was kindly sponsored by Vivint. Find more from Vivint at The NeighborhoodTwitterFacebook, and Pinterest. All images, content, and opinions expressed in this post are my own.

Tuesday
Dec112012

DIY Gift Wrapping Kit

Tip: click on the tutorial images below to see an enlarged view in a new window.

A few years ago I posted about a special gift wrapping kit that I made as a birthday gift for my sister. She ended up loving the gift and that post is one of the most visited here on Creature Comforts, so today in partnership with Waverly, I thought I'd finally share a more official DIY Gift Wrapping Kit for any of you who have a pretty packaging fiend on your holiday shopping list. What I love most about giving kits like this is how truly unique and customizable they are. You know that your loved one can't go out and buy it for themselves, they will never receive another one like it, and they will feel truly spoiled!

In this post I'll be sharing a few simple DIY techniques for pretty goodies that you can fill your kit with. But of course these are just the tip of the iceberg...the possibilities for what you might fill your own kit with are endless! Tip: to make things easier, and for a more finished looking presentation, I recommend working with a specific color palette or theme in mind. This will make finding supplies much easier (they'll practically jump out at you while shopping)...and the whole process a lot more fun.

Here's a list of what went into my finished kit (keep reading for the DIY for many of them):

  • DIY Fabric Handle Gift Bags - tutorial here
  • Mini ball garland - JoAnn
  • DIY Fabric Ribbon - tutorial here
  • Assorted yarns and twine - JoAnn's, Michael's and We Sell Coffee (baker's twine)
  • Tissue paper - Hobby Lobby
  • Scissors - JoAnn's
  • Assorted ribbons - JoAnn's
  • Gift wrapping tape - Target
  • Adhesive sticker dots - Michael's
  • Mini kraft bags - Michael's
  • Adhesive-Backed Fabric Bag Seals - tutorial below
  • DIY Paper-Backed Fabric Gift Tags - tutorial below
  • DIY Yarn Pom Poms - tutorial here
  • Glitter - JoAnn's
  • Assorted sequins - JoAnn's
  • Mini jingle bells - Michael's
  • Red mini pom poms - Michael's

And for packaging it all up:

  • Glassine bags in assorted sizes - available at Shop Sweet Lulu
  • Wooden spools - Hobby Lobby
  • Photo storage box - Hobby Lobby

Additional supplies:

  • Waverly fabrics - JoAnn
  • Waverly yarn - JoAnn

Up first in the kit we have some simple DIY Fabric Adhesive Bag Seals:

You may recall my 5 Minute DIY fabric stickers post from a couple years ago. I'm still using those sweet stickers for gift packaging and thought they'd make a fun addition to the gift wrapping kit. I made these ones a bit wider and longer than the version from my previous post so they could serve as adhesive bag seals. Easy!

You'll need a Xyron sticker maker with a permanent adhesive tape roll (found at craft stores for around $10). For the seals, cut strips of fabric that are narrow enough to fit through the opening in the sticker maker, and about 10" in length. Feed your fabric through the machine with the printed side of your fabric facing up. Follow the directions that came with your machine for proper use. Remove the clear plastic covering off of each sticker, set aside, and repeat process with remaining fabric strips.

Cut your 10" sticker strips in half so that you are left with two 5" stickers. Use a sharp pair of scissors to cut a notch out of the end of one side of your sticker so that it looks like a pennant flag. Repeat with remaining stickers. For presentation, place stickers in a glassine bag or bundle them together using a strip of paper wrapped around the middle (secure the paper band with a piece of tape).

Next up we have another simple project that I repurposed for this gift kit...my DIY Paper-backed Fabric Gift Tags. I used several different fabrics to create an assortment of tags. My favorites are these pretty white ones that look hand-stitched. I love these tags because they are so very simple to make, but you would never guess that when they are prettying up the top of a gift.

No matter what fabric you use, the process will be the same (I use two different fabrics in the steps below...I hope it's not too confusing):

Apply glue stick to a piece of heavy-weight cardstock, making sure to coat a surface area that is as large as the portion of fabric you will be gluing to it. Place your fabric (right side up) onto the glued paper and press firmly all over the design to adhere.

Once the glue has dried, use a pair of sharp scissors to trim around your fabric tag. For printed fabric, you can simply use the outside edges of the design as your guide or cut a shape free-hand. Attach an adhesive dot to the back of each tag, or include a little glassine bag filled with them so your gift recipient is well-stocked and ready to wrap.

Another easy idea that has big impact is to include little spools of pretty twines and ribbons inside your kit:

Follow the directions for my DIY Fabric Ribbon here. For yarn and twine spools, just begin wrapping twine/yarn around a plain wooden spool (sold in packages at craft stores for a couple dollars) until they are full. Ta-da!

Package little crafty supplies inside glassine bags for a cohesive presentation.

Keep mini kraft bags, gift tags, or anything else that is flat from getting loose by banding it with paper. Just wrap a strip of scrap paper around until snug and secure with tape. You can label or leave the band blank...it's up to you.

Package everything inside the photo box starting first with the flat supplies (such as gift bags and tissue), and layering additional supplies as they fit best. If you will be shipping your gift, be sure to fill in any empty spaces with crumpled tissue paper so that the supplies stay in place.

Write a sweet note or the recipient's name on the tag in the front of the box (optional). Tie your kit up with some of the gift wrapping supplies you created (for a little hint at what's inside) and give!

Here are a few additional supply/source suggestions for filling your gift wrapping kit:

  • Printable tags and labels online (check out my free printable gift tag roundup for a few ideas)
  • Manila tags, metal-rimmed tags, colorful or metallic binder clips, adhesive labels - found in office supply stores
  • Glassine bags (assorted sizes) found online
  • Mini clothespins, glitter, sequins, decorative papers, the list goes on - found in craft supply stores
  • Fabrics, trims, ribbons, buttons, etc. - found in fabric stores
  • Japanese masking tape - found online
  • Anything else you thing the gift recipient will love! 

--------

This post was kindly sponsored by Waverly. Follow them on TwitterPinterest, and like them on Facebook. The DIY content, images, and opinions shared in this post are my own.

Wednesday
Dec052012

5 Minute DIY: Fabric Handle Gift Bags

Today I'm delighted to have teamed up with Waverly to create a fun and simple DIY that will only take you a few minutes to make: DIY Fabric Handle Gift Bags!

There's certainly nothing wrong with using a plain store-bought gift bag...but with only a few minutes and minimal supplies there is really no reason not to make that basic bag into something worthy of the gift you're giving! Here's how to create your own:

Supplies needed:

  • Cotton fabric. I used fabrics from Waverly that I purchased at my local JoAnn's (you can also purchase them at JoAnn's online).
  • Gift bags with removable twine/ribbon handles. I found the ones for this project at Target and Hobby Lobby for around $1 or less each.
  • Fabric Scissors
  • Bamboo skewer (optional)
  • Yarn (optional)

Simple Fabric Handle Bag: Version I

Remove the original handles from your gift bags. Cut your fabric into strips that are equal in length, or longer than the handles you removed. Be sure to include a little extra length for tying. I cut my strips freehand for a more organic look, but you can use a ruler and be more precise if you'd like. My strips were around 1.5" wide. The length is determined by the size of your bag and the handle size that you'd like to have.

To thread your new handles on, pinch the end of your fabric in half once and then fold it in half again. Thread the folded end through one of the holes in your bag (threading from the outside of the bag, in). A bamboo skewer may come in handy for pushing thicker fabrics through the opening, especially if the holes are on the smaller side.

Once you have threaded both sides through (like seen in the image) tie a not in each end. Trim off any excess fabric and straighten your handles. Repeat with the other side, making sure that your handles are the same length. Trim off any loose threads...and you're done!

If you'd like to add on a simple pom pom like I did in the example above, you can find my fast and easy 5 Minute DIY: Yarn Pom Pom video here. Just tie the pom pom on your bag's handle using the two loose yarn ends. Snip the excess yarn off to finish.

Simple Fabric Handle Bag: Version II

Cut fabric strips the same way you did in Version I...but this time you will want to make them quite a bit longer so that you can have a nice tail at the end of each handle. The actual size will depend on your bag and your preference. Remove the handles that came on your bag and thread your new fabric handle through (threading from inside, out). pull the handles down until the handle loop is the size you want on top, and you have long enough tails threaded out the front.

Tie a knot in each end of your fabric handle, leaving nice tails at the bottom. Create a decorative end like I did on mine by folding your handle in half (as shown) and cutting at an angle with the scissors pointed down towards the open edges. Repeat handle-making process on the other side, taking care to make sure your handles are the same length (you will do this during the knotting stage). Trim off any loose threads. Fill your bag with a gift and give!

Additional credits: Maileg Deer Softie from My Sweet Muffin (sold out) | Gift Bags from Target and Hobby Lobby | Find my 5 Minute DIY Yarn Pom Pom Video Tutorial here.

--------

This post was kindly sponsored by Waverly. Follow them on TwitterPinterest, and like them on Facebook. The DIY content, images, and opinions shared in this post are my own.

Monday
Dec032012

DIY: A Neighborly Get Well Kit

Tip: click on the images for an enlarged view.

After moving from our last home, where we had possibly the world's most atrocious neighbors, I wasn't expecting much from our new set. So imagine my delighted surprise when several of them stopped by to welcome us to our new home. During that Spring when our lawn needed cutting for the first time, I looked out my window to discover our neighbor mowing it for us (he still regularly mows it...even though I run out and tell him not to). Our neighbors on the other side of us have offered to accommodate us in their storm shelter during the seasonal tornados we have. And two years ago they even shoveled our driveway after a freak 18" snowstorm left our city marooned for days. All of this is to say, that after having such horrible neighbors in the past, I truly know just how much it matters when the neighbors you have are good. And it goes both ways...I try to be an awesome neighbor too (these fleur de sel caramels were a huge hit last year)!

So when Vivint (a leading provider of simple, affordable home security and other home solutions) asked if I would like to create a couple DIYs with warm neighborly giving in mind, I was excited for the chance to put my neighborly thoughts into action. Vivint's new blog, The Neighborhood is a site with one purpose: to promote better safer neighborhoods through simple acts of neighborliness. Their site features tons of great ideas to bring your community together...DIYs, printables, activities and more. I'm all about this kind of mission...aren't you?!

So with cold and flu season upon us, it seemed that the perfect idea for my first project would be to put together a quick little get well kit that is ideal for a neighbor or friend who is under the weather. The kit includes ingredients for making a delicious Honey Lemon Throat Soother tea (I drink it every time I get a sore throat and it always helps), as well as comforting necessities like cough drops, lip balm, and tissues.

--------------------------------------------------------------------------------------------------------------------

Here's what I used to create my kit: 

  • Large mug | Target, approximately $4
  • Honey bottle | Grocery store, $4.50
  • Fresh lemon | Grocery store, $.40 each
  • Chapstick brand lip balm | Target, $2
  • Tissues | Target, set of 3 for $2
  • Burt's Bees Honey & Lemon Throat Drops | Target, $2
  • Optional - Clear Cellophane Basket Gift Bag | Michael's, set of two small bags for $1
  • Free printable gift tag (download found below)
  • Twine
  • Scissors

The Get Well Kit is as easy as can be to make. Just arrange everything inside the mug until it looks how you'd like it to. If you will be using a cellophane gift bag you can include more than one lemon (since it won't fall out). Print the file (download below), cut out your tags, and attach them to your gift with twine.

There are two tag color options (yellow and teal) with both "Get Well" text and the instructions for making the Honey Lemon Throat Soother, as well as one blank grey version (in case you'd like to create your own tag).

If you'd like to make the Honey Lemon Throat Soother for yourself, here are the simple steps:

Boil water. Wash a lemon and cut it in half. Squeeze the juice from one lemon half into your mug and place juiced peel into the mug as well.

Pour a generous serving of honey over the peel in the bottom of your mug. Carefully pour boiling water into the mug and allow drink to steep for 10 minutes. Remove peel and any seeds. Add extra honey if needed. There should be an even balance of flavor between the honey and lemon...not too sour and not too sweet. Sip and feel better!

Psst...If you want a chance to win a ticket to attend Alt Summit 2013, hop on over and check out the giveaway I'm currently promoting for Vivint!

--------

Disclosure: This post was sponsored by Vivint. Find more from Vivint at The Neighborhood, Twitter, Facebook, and Pinterest. All images, content, and opinions expressed in this post are my own.

Related Posts Plugin for WordPress, Blogger...