Color Inspiration Daily: 12. 17. 12

Floral Centerpiece Tutorial for Coco + Kelley, with florals by Kiana Underwood of Tulipina and photography by Angie Cao (via)
 Monday, December 17, 2012
 From time to time Creature Comforts may include affiliate links to products featured in their posts and/or affiliate banner ads. However posts and featured products seen on Creature Comforts are never controlled or selected by advertisers or affiliates. Featured items are products that we personally like, and would share regardless of affiliate partnerships. If you choose to purchase an item that has been featured from an affiliate link or ad banner, we may receive a small commission on that sale.

Floral Centerpiece Tutorial for Coco + Kelley, with florals by Kiana Underwood of Tulipina and photography by Angie Cao (via)
 1 Lovely Comment |
  Email Article | found in
  Color Inspiration Daily
  Print Article |
  Share This |
  | by
| by  Ez
Ez  Monday, December 17, 2012
 Hi friends! I'm back today with another fun holiday project that I created in partnership with Waverly: Festive Wooden Trees! I first made these trees to decorate my home a couple holiday seasons ago (you might have also spotted them over on my Instagram a few weeks ago), and have always intended to share a tutorial with you here (better late than never, right).
Even though this project involves the use of a craft knife (I know that can be intimidating) it is actually pretty easy to create...just a few straight cuts, glue, and you have a nice bit of modern holiday decor for your home! Let's get crafty!
Supplies needed:
TIP: Click on the tutorial images below to see an enlarged view in a new window.
Gather your supplies.
Place your wood down onto your self-healing mat, aligning it with the mat's ruled lines. Determine the height that you'd like for your tree. I chose 5" for this one, so I'll use that measurement in my description. Place your ruler across your board at the 5" point and hold firmly in place. Use your craft knife to cut along the 5" line using the ruler as your guide. Use steady firm pressure. You will need to make several cuts before you will pass through the board, so don't worry if it doesn't go through with the first cut.
Once your rectangular portion has been cut, align it with the ruled lines on your mat again.
Next we need to find the center of the board. Since the board I purchased is 4" wide, we will note that the center falls at 2" in (if your board is a different width you will need to find the center of it by measuring). Place your ruler first at the bottom left corner of your board, and then up to the 2" center measurement (as noted in red).
Once again use your ruler as your guide to cut along this measurement with firm downward pressure. Use slow steady cuts until you've made it through the board. Remove the skinny triangular-shaped piece that you just cut off, and set it to the side.
Now repeat the measuring steps on the right-hand side of your board. First place your ruler at the bottom right-hand corner and make sure the ruler then passes through the 2" center line. If you are using a clear ruler, you will see that you have a large triangle-shape beneath your ruler (as seen above). That means you're doing it right! Cut along the edge of the ruler to remove the second skinny triangular-piece.
You should now have three triangular pieces: 2 narrow and 1 wide.
So that they will fit onto your tree more seamlessly, you will want to cut away the tips of the two smaller triangular pieces. I placed the pieces together (forming a larger triangle) and just trimmed off the top using my craft knife and firm downward pressure.
Align your large triangle with the mat's ruled lines and use a ruler and pencil to mark a light guide line down the center. Flip the triangle over and make the same mark down the center of this side.
You should now have 1 large triangle with markings down the center of both sides, and 2 smaller triangles.
Squeeze a small line of glue along the pencil line on one side of your large triangle.
Take one of your small triangles and embed the long edge of it into the glue line.
It is very important to make sure that the bottom edges are aligned (seen in the photo above) and that the smaller triangle is not overhanging the edge. If this happens you will end up with a wobbly tree. If it is not aligned, just move the boards around until they are in the position you'd like them to be. Use gentle downward pressure on the top edge of the smaller board to make sure that it is properly set into the glue.
At this point you can use your fingertip (or a q-tip) to wipe away any excess glue.
Lay your glued boards to the side to allow the glue to set (it shouldn't take too long). You can work on creating additional trees while you are waiting, or go make yourself a cup of peppermint hot cocoa! Yum!
Once the first side has set, repeat the gluing process with the second side. Set it aside to dry completely (you can leave it standing upright).
If you want to get extra crafty, you can make a fuller tree! First make the basic tree (explained above) and then add 4 extra pieces. You will do this by cutting a board using the same measurements as used on the original tree. Just be sure to cut the larger triangle in half (so that it forms two triangles), so that you are left with 4 tall triangles to add to your basic tree.

Arrange them in your home and enjoy!
If the plain wood doesn't suit your holiday decor, there are endless ways that you can customize these trees to your liking. Here are a few ideas:
Have fun and make merry! xo Ez
--------
This post was kindly sponsored by Waverly. Follow them on Twitter, Pinterest, and like them on Facebook. The DIY content, images, and opinions shared in this post are my own.
 6 Lovely Comments |
  Email Article | found in
  D.I.Y. + Projects,
  Holiday Inspiration/Projects
  Print Article |
  Share This |
  | by
| by  Ez
Ez  Friday, December 14, 2012
  1 Lovely Comment |
  Email Article | found in
  Art,
Art,  Color Inspiration Daily
  Print Article |
  Share This |
  | by
| by  Ez
Ez  Friday, December 14, 2012
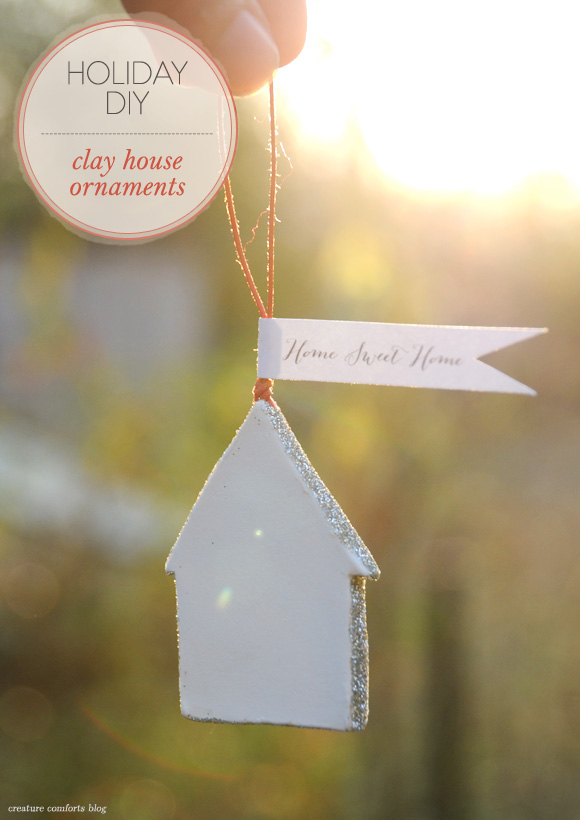
Hi friends! I'm back for my second neighborly-inspired project (here is my first one), in partnership with Vivint and their blog The Neighborhood.
But first before we dive into this fun project I want to quickly remind you all that today is the final day to enter for your chance to win a free admission ticket to attend Alt Summit 2013. Jump on over and enter...you can submit as many entries as you'd like to increase your chances. I hope I'll be seeing you there!
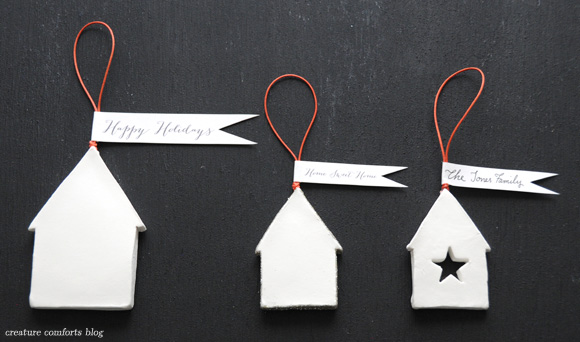
Okay, now on to the house-making!
This project is pretty simple to create. You could easily make an entire neighborhood of houses without too much effort.
Tip: I recommend storing your extra clay in an air-tight container while you work so that it doesn't dry out and you can use it again for other projects (such as my DIY Lollipop Ornaments, Scandinavian Inspired Star Garland, Nursery Mobile / Wall Hanging, or Easy Geometric Gem Mobile). Can you tell that I like this type of clay?!
Supplies needed:
Optional items for customization:
Tip: You can see the tutorial steps at an enlerged size by clicking on each image.
Cut out the house template you'd like to use (there are two size options available on the printable file), then begin by protecting your work surface with a piece of freezer paper (waxed side up) or waxed paper. Take a golf ball sized portion of clay (or larger if needed) and begin rolling it out using your rolling pin. Make sure that the flattened shape is is both wide and long enough to fit the house template you will be using. The finished thickness of your rolled clay should be about 1/4."
Place your template on top of your prepared clay and use the tip of your craft knife to lightly trace around the outer edges of your template. The goal is not to cut all the way through the clay, but to give yourself a guide for the next step. Once you've traced your house shape with your blade, begin cutting out your house. This is best accomplished by cutting straight lines all the way along each flat edge until your blade passes through the edge of your clay. This will remove clay in smaller sections and will give you the cleanest edges on your house. Tip: If you are worried about cutting into your work surface, I recommend working on top of a cutting board or self-healing mat.
Use your finger to smooth out any roughness on the edges or surface of your house. It can sometimes help to add a dab of water to your fingertip during the smoothing step. Once your shape is nice and smooth, use the sharp end of a skewer to press a hole into the center of the top point of of your house. The impression doesn't need to be too deep. This is where you will be gluing your twine for hanging.
While the clay is wet you may wish to add additional decorative touches to your house. In the first example I used my craft knife to very gently create the outline of a door and window. In the second, I used a small star cookie cutter to punch a design out of the center. If you would like to glitter your ornament, you will need to wait until the design is dry to do so (keep reading below).
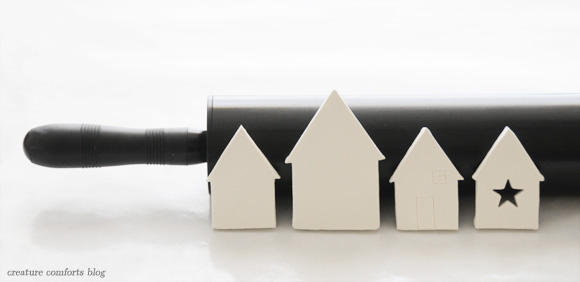
Cut out as many house shapes as you'd like to make and lean them gently against a surface to air-dry. The drying process takes several hours, but I recommend letting them dry overnight for best results. If you are able to rotate the shapes half-way through the drying process so that the more damp side is facing out, they will dry more quickly.
Once your houses are dry you can use them as is, or embellish with glitter. To glitter the edges of your dry house like I have here, apply glue along the edges using a paintbrush. Sprinkle glued area generously with glitter. I recommend working over a piece of scrap paper to make clean up easy, and so you can reserve the excess glitter. Tap your ornament to remove excess glitter and allow the glue/glitter to dry. Next, cut out the pennant flags that you'd like to use on your house. Blank tags are included incase you'd like to write your own message. Leave at least 1/4" of blank space on the flat side of the tag if you are writing your own message.
Create a loop for hanging. Select the length of twine you'd like and tie the two ends together. Be sure to leave a small tail of twine beneath your knot. This will come in handy when attaching it to your ornament. If you'll be including a paper flag, apply a small amount of glue to the backside edge (the side without the message) of the paper. Sandwich the bottom of the loop inside the end of the flag, folding over just enough of the paper so that it seals around the twine. Press firmly for a few seconds to make sure that it adheres. Allow glue to set.
Once your tag is dry, apply a small bead of glue into the hole that you made at the top of your house ornament. Take your twine loop and place the ends into the hole until they are embedded and glued in place. Make sure your flag is facing the right direction (rotate the loop as needed to adjust). Allow the glue to fully dry.
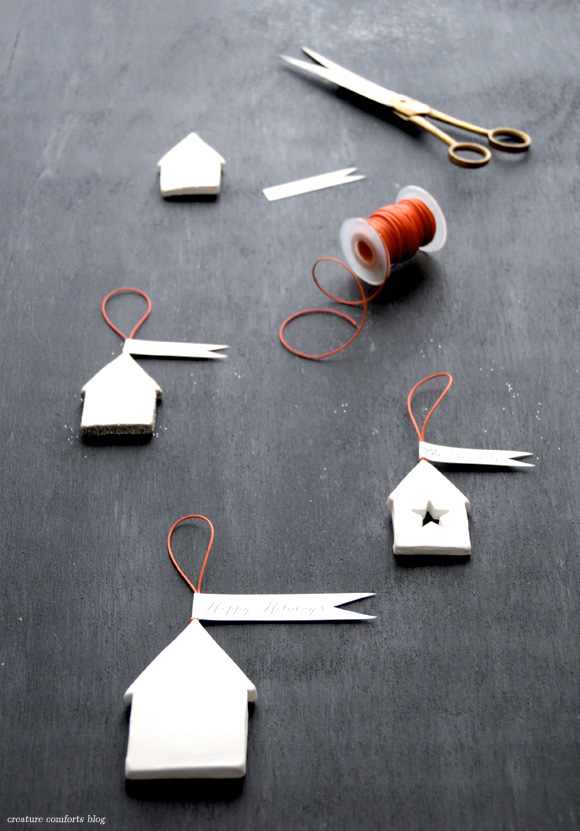
Give your beautiful handmade ornaments as gifts to your neighbors and loved ones. Bonus: these ornaments would also make a thoughtful housewarming gift at any time of the year. An ornament flying the "Home Sweet Home" flag would look lovely hung in an entryway all year 'round!
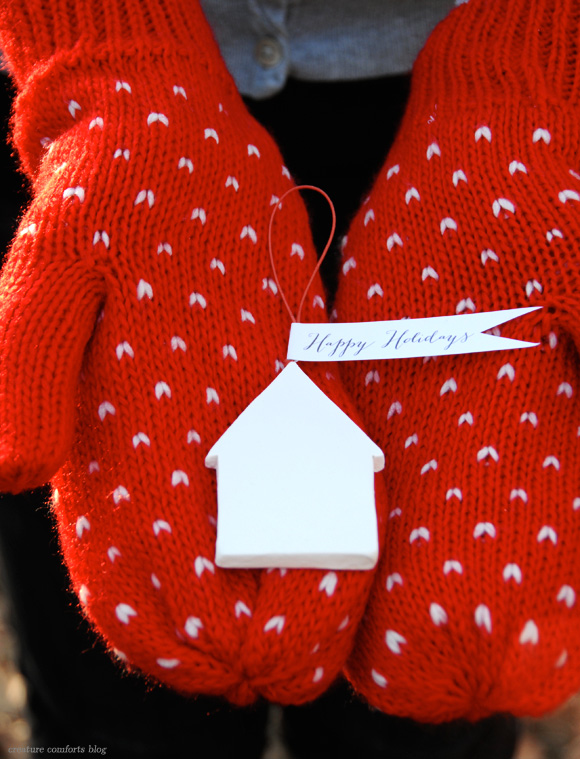
Happy holidays friends! xo Ez
--------
This post was kindly sponsored by Vivint. Find more from Vivint at The Neighborhood, Twitter, Facebook, and Pinterest. All images, content, and opinions expressed in this post are my own.
 12 Lovely Comments |
  Email Article | found in
  D.I.Y. + Projects,
  Gift Giving / Wrapping Ideas
  Print Article |
  Share This |
  | by
| by  Ez
Ez  Thursday, December 13, 2012
  Post a comment |
  Email Article | found in
  Color Inspiration Daily
  Print Article |
  Share This |
  | by
| by  Ez
Ez  Thursday, December 13, 2012