Partners

Newsletter Sign-up


Lovely Sponsors


Currently Obsessed

Subscribe

Lovely Press

Disclaimer

From time to time Creature Comforts may include affiliate links to products featured in their posts and/or affiliate banner ads. However posts and featured products seen on Creature Comforts are never controlled or selected by advertisers or affiliates. Featured items are products that we personally like, and would share regardless of affiliate partnerships. If you choose to purchase an item that has been featured from an affiliate link or ad banner, we may receive a small commission on that sale.

Privacy Policy
Hosted by

Entries from August 1, 2012 - August 31, 2012

Friday
Aug032012

Weekend Link Love: 5 Savory Recipes I Can't Wait to Try

Hi friends! I thought I'd close out the week with a quick roundup of some ever so tasty looking savory recipes that I've been eyeing. I'm shopping for the ingredients for at least two of them later today (can you guess which ones). Have a wonderful and relaxing weekend! xo Ez

  1. Roasted Potatoes and Marinated Summer Vegetables with Lemon Aioli from Suvi sur le vif (via Laura
  2. Roasted Corn Soup with Tomato from Sussman Brother's: This is a Cookbook, shared by Williams-Sonoma
  3. Fries with Lemon Salt & Rosemary from Alexandra's Kitchen (via Jessica)
  4. Spicy Buttermilk Onion Rings with Buttermilk Ranch from A Cozy Kitchen (via The Gilded Lobster)
  5. Summer Corn Cakes with Chopped Tomato and Avacado Salsa from Ezra Pound Cake (via Leila)

And just in case you missed them, here are a few of the most popular posts on CC this week: 

Thursday
Aug022012

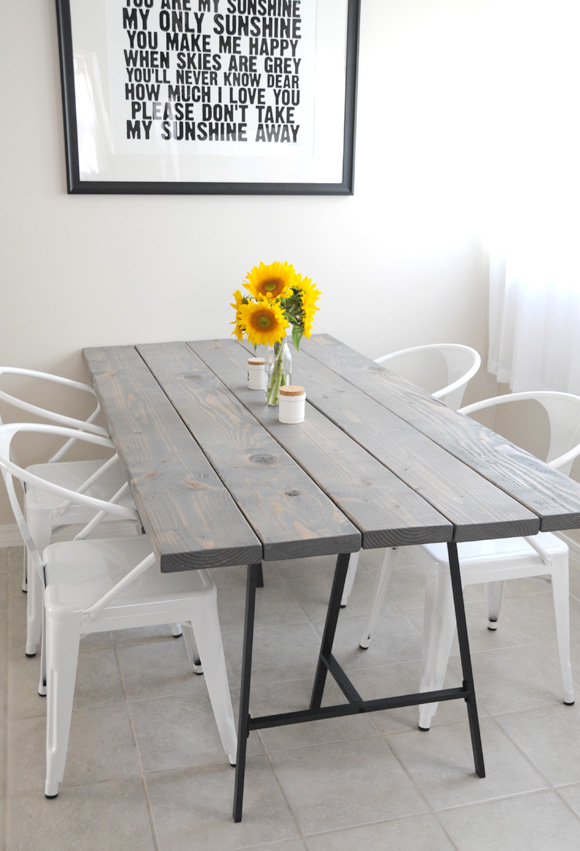
A Story About A DIY Table and Four Awesome Chairs

Hi guys. Sorry for the late post today. It took me longer than anticipated to write this up. Anyhow, as promised, I want to share some photos and a bit about the process of creating my DIY table...including some tips I learned along the way.

This project was a mishmash of two different DIY table tutorials that I fell in love with — this DIY Table from Stylizimo and this version from Our Vintage Home Love. I went into this with very little knowledge when it comes to building things with wood, and while the end results are probably far from perfect, I love my new table...wonkiness and all.

Here are some of the process shots I took and shared over on instagram with detailed notes on each step:

  • The total cost for supplies for this project including the wood (not including the legs) came to $140. I purchased everything (except for a power drill/screwdriver and leather work gloves that I already owned) at Home Depot (I'll include a full list of supplies at the end of this post). The great thing about their store is that they will cut the wood you need to the exact size specifications that you want for no extra charge. Note: You do have to buy the wood at the cost of the full board regardless of what size you have it cut to. That is probably a no-brainer, but I didn't know that until checkout. For my table I had five 2x8 untreated boards cut to 6' each and then two 1x4 boards (thanks Chris for the updated info) cut into 4 portions of 3' each (I only ended up using 3 of them). The table legs are from IKEA (purchased online) and including shipping came to $40.
  • I was so glad that I purchased an electric sander. It would have taken me weeks to sand the boards down by hand. With the sander it took me two afternoons (it was also blazing hot outside, so I probably could have done it easily in one afternoon if it had been cooler out). I followed the sanding grit recommendations on Our Vintage Home Love, and it worked really well.

  • I found sanding to be really enjoyable (maybe I'm a bit nutty). Seeing my finished and oh-so-smooth boards all stacked up and ready to be made into a table was really satisfying.
  • I wanted to achieve a similar stain on my table that Stylizimo did on hers, but wasn't able to find the brand that she used. Fortunately after a bit of online research I discovered that Minwax makes a grey stain that looked like a decent match. I stained and waxed according to the directions on Our Vintage Home Love...but only used one coat of stain (left on for the minimum amount of time) and did not sand after staining. The end results are probably a bit more grey than I would like, but I do think it has a really nice aged wood look...which is what I was going for.

  • A note about staining and waxing...it is really messy (and stinky), so be sure work in a ventilated area, wear proper work clothing, and protect the surface you are working on as well. I had grey stain leftover on my legs and toes for days (most of it came off with nail polish remover thankfully).
  • Once the wax was dry my daughter helped me bring the boards inside and we laid them out to be assembled. Unfortunately I quickly discovered that the screws I'd purchased were not long enough, so I had to run out and get longer ones. I decided to use my support boards in three positions across the bottom of the tabletop. They are arranged with two of the boards at 9" in from the ends, and the third board centered between those (at around 21.5"). The finished table top is pretty heavy...so you will definitely need assistance to place it on the legs. If I were to do this all over again, I might try thinner boards (although it seems like those might warp easily over time).

Another note: I was overly-excited about having the table set up in my house and made the mistake of bringing it in directly after the wax/stain had dried. The fumes were so overpowering after an hour that we ended up having to take it back outside for another two days so that it could properly outgas. Pew!

Here are two peeks at the underside of the table. You can see that I got a little bit excited while using the power screwdriver. It seemed safer to err on the overzealous side...I definitely don't want one of these boards coming off on my legs while I'm eating breakfast!

When selecting boards it is also a good idea to visually inspect each one before having it cut. I didn't happen to notice that one of my boards was super rough and chipped along the edge and it was quite the task to sand it down. I actually like the aged effect that it has going on, but I thought it was worth mentioning incase you want something a bit smoother.

And there you have it. A very labour-intensive DIY, but one that I am extremely happy with. I can't really even describe how gratifying it is to sit down to a meal at a table that you personally created and worked so hard on! Definitely worth $180 in my opinion!

Ohhh...and the chairs! I spotted these White Tabouret Stacking Chairs from Overstock.com over on Pinterest, and at $180 for 4 chairs (and tons of positive reviews) I couldn't pass them up (plus it was only $2 for shipping). They are surprisingly comfortable...the curve of the back is just right, and are a great weight and size. The only negative I have to say about them is that one of the chairs has plastic shipping material melted onto the leg and we are having a hard time getting it off. I'm sure this has more to do with the scorching 115 degree temperatures we've been having (probably hotter in the back of a shipping truck) than anything on Overstock's part. I'm hopeful that we'll be able to remove it with some special cleaners and a bit of elbow grease.

DIY table supply list:

  • Five 2x8 boards cut to 6' in length
  • Three 1x4 boards cut to 3' in length
  • Ryobi Sander
  • Sanding paper in 220 and 150 grit (make sure you have plenty on hand)
  • Leather / cloth work gloves
  • Rubber gloves (for use while staining/waxing)
  • Drop cloth (I used a plastic cloth because it was the most affordable option)
  • Clean cotton rags (you will need quite a few)
  • Tack cloth (a sticky cloth sold in the painting section, used to pick up fine dust particles before staining)
  • Wood Screws, 1-3/4" (as you saw earlier...I used a lot)
  • Power screwdriver
  • Paintbrush - I used a 3" brush made for use with stains
  • Minwax Wood Finish in Classic Gray 271
  • Minwax Paste Finishing Wax in Natural
  • Vika Lerberg Trestle Legs from IKEA 
  • You will also need some sort of a sawhorse or raised work surface that can get messy when sanding and staining. I used an old desk (for the sanding portion) and two scrap blocks of wood (for the staining portion).
Thursday
Aug022012

August 2012 Calendar Download

Hi lovelies! I painted up this watermelon printable August calendar page for you all yesterday. Feel free to print out extra copies so you can cut out and use the illustrated section as a postcard to brighten a friend's day. If you missed any of the past calendar downloads and want to print them out anyhow, you can find them here.

Thursday
Aug022012

Color Inspiration Daily: 08. 02. 12

Fashion Illustration by Giulio Iurissevich (also find him here)

Wednesday
Aug012012

DIY Clay Nursery Mobile or Wall Hanging

I have two friends with new babies and a sister who is expecting, so instead of scour the interwebs and stores for gifts that may or may not be exactly what I would want to give (and would probably cost more than I want to spend), I decided that I'd make their gifts myself. I've actually had this project idea up on my DIY idea wall for half a year, so I was thrilled to actually find the time to try it out. It ended up being so fun and easy to make that it seems only fair that I share a tutorial with you all so you have a sweet DIY gift in your arsenal next time you have a special baby to spoil.

Psst...You can make at least three different mobiles with just the one package of clay. Personalized handmade gifts for less than $3 a piece = Awesome! 


  • Printed template (download above)
  • Scissors
  • Rolling pin
  • Craft knife
  • Gel or felt-tipped pen (a finer tipped pen will work better than one with a large tip)
  • Waxed paper for freezer paper (for protecting your work surface)
  • Premier Stone Clay - available at craft stores such as Michael's or online
  • Air-tight container or sealable plastic bag (for clay storage)
  • Small glass of water (optional)
  • Scrap paper

For finishing you will also need: 

Cut out your paper templates along the outside of the grey border.

Cover a smooth hard working area with a piece of wax or freezer paper (freezer paper, waxed side up works the best). Use your rolling pin to flatten your clay into an area that will fit at least one of your template shapes. The finished piece should be rolled to about 1/4 inch thick.

Place a template onto the prepped clay and use the tip of your craft knife to carefully trace around the outside of the design. You don't need to worry about cutting all the way through the clay the first time around. Once you've traced the design, use your craft knife to cut off the excess clay. Be sure to store all extra clay inside an airtight container while working so that it doesn't dry out.

Helpful bear-cutting tip: I found that it is easiest to cut the bear out by making as many straight cuts as possible. You can then round off the proper edges once you've removed the template.

Your cut out pieces might look a little bit jagged. No need to worry! Smooth out the edges by dipping your fingertip into water and gently rubbing along all the outside edges (you can smooth the surface as well if you'd like).

Once you've cut and smoothed out all your pieces, arrange them on top of your waxed paper in the order that you would like to hang them in. You can use the same layout that I used, or create your own arrangement.

Use a wooden skewer to pierce a hole into each piece where you will need to attach your twine for hanging. This hole will give you a place to glue your twine into later on, so be sure that you don't skip this step.

The hole-piercing configuration I used was: Bear: 2 holes - One at the top center, and one at the bottom center | Cloud: 4 holes - One at the top center, three spaced along the bottom edge | Raindrops: 1 hole - At the top of each droplet.

Now the hardest part...waiting for the pieces to dry. Start by allowing the clay to dry on a flat surface (I suggest using your waxed paper) and then after an hour or so, prop the pieces up against something to allow air to circulate around them. For best results, allow everything to dry for at least 12-24 hours or until completely dry to the touch.

Woohoo! They're dry! Now you get to add character to your mobile! Use a pen to create a design inside your clay pieces. For this project I wanted to keep it super simple, but you can be as creative as you'd like.

You can even fill in your shapes with colored pencils (or acrylic paint) if you'd like!

I decided to just use pen on mine. Make sure to create a design on both sides if you want the finished project to be used as a hanging mobile (that way there is always something sweet showing).

You can also include a child's name or a sweet greeting (i.e. "Welcome") on the cloud.

Tip: If your pen is drying out while you are working, you can fix the problem by scribbling a bit on a piece of scrap paper.

Arrange your pieces again how you'd like them to be while hanging. Now it's time to prep the twine. First create a loop for hanging the mobile. Make sure your knot is not too bulky.

You can determine the length of twine needed for each section by measuring it up against the arranged mobile. Now create the twine pieces for each hanging section by knotting both ends of each twine portion. 

Place the completed twine portions down into the right spaces as you work.

Plug your glue gun in or get out your Elmer's Paper Craft Gel Glue (this particular glue adheres to the clay very well and dries fairly quickly). Place a small dab of glue on one of the holes in your piece. Use your wooden skewer to push one knotted end of your twine into the hole with the glue. Repeat this process until you've attached your entire mobile together. It is best to leave the mobile laying down on your working surface while you are working so that the glue sets properly.

Bonus idea: It also occurred to me that you could make some pretty adorable Holiday ornaments by just making the bear portion of this DIY!

Once the glue has dried completely your mobile is ready to be hung up or given as a gift!

A special note: Please be sure that mobiles are hung out of reach of babies and small children. This project is meant to be an art piece, not a toy...and therefore is not strong enough to withstand a little ones' attention.

Tip: I recommend making several mobiles all at once, then you can tuck the extra ones away until you're in need of another baby gift. Just fill in the details with a pen when the time is right!

Related Posts Plugin for WordPress, Blogger...