


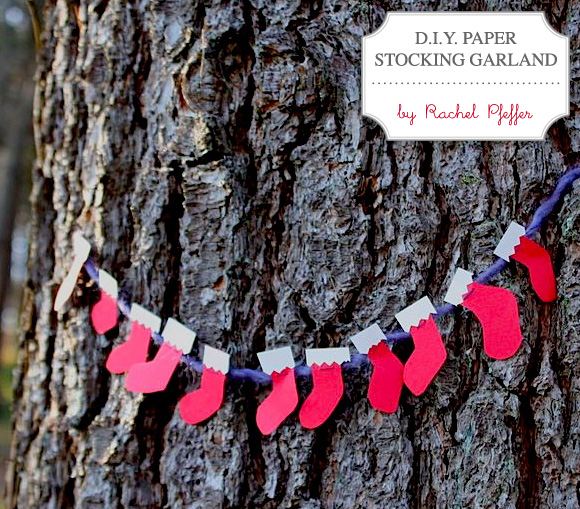
D.I.Y. Paper Stocking Garland by Rachel Pfeffer
This cute and easy D.I.Y. project for a Paper Stocking Garland was created for our 18 Days Series by the lovely Rachel Pfeffer of Luckyduct. She's used red paper for her project, but you can use any kind you like for yours. Red, patterned, etc. Perhaps you can even embellish each stocking with some glitter or other festive elements. Here is more from Rachel on how to create your own charming garland:
Materials needed:
- Red and white construction paper (or other crafting papers of your choosing)
- a pen or pencil
- pinking shears (if you want to get fancy)
- a piece of yarm, ribbon, or twine
- glue stick or hot glue
- needle and thread (or a small hole punch)
Directions: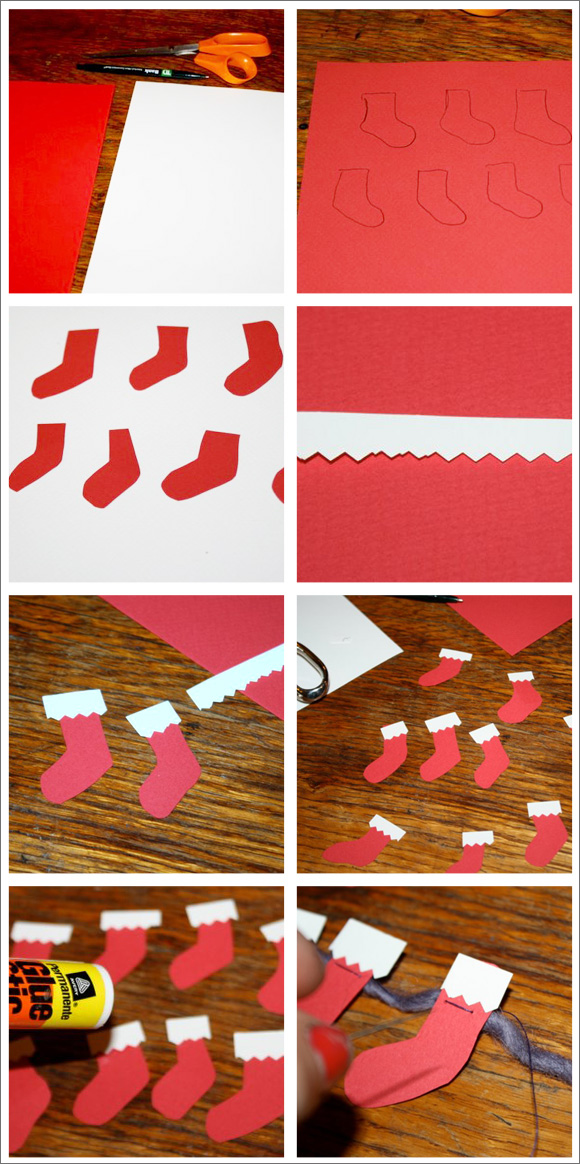
1) Gather your supplies.
2) Draw about 10 stocking outlines. I just looked up a picture online for a reference, but it's fun if they are each a little different.
3) Cut out stockings!
4) Trim a strip across the top of the piece of paper with the pinking shears, so that the top of the strip is flat, and the bottom is zig-zagged or scalloped. Regular scissors can also be used for this part, though it will not have the scalloped edge.
5+6) Place the strip of white paper over a stocking, and cut a section that is just slightly wider than the actual stocking. Repeat for each stocking, until you have all of the top trims.
7) Using your glue stick, glue the white trims to the tops of the stockings.
8) Here is the fun (or not so fun, depending on your patience and commitment to the craft) part. I used a long piece of yarn, but a thin piece of pretty ribbon would look great, too. Using a needle and thread, simply stitch each stocking onto the piece of yarn in a row, right beneath the white paper trim. It lends the finished product a nice little touch, but it would be just as good and more efficient to use hot glue or a small hole punch (just punch two tiny holes and thread your twine through each stocking).
Ta-Da! Your strip of mini stockings is now complete. Hang it on your front door, a wall above the fire place, above your bed, anywhere you want a tiny magical little detail in your house. I strung it on the front of my wood stove door, and then on a tree. The latter wasn't very practical, nor meant for a long period of time, but it made a great picture!
Thank you so much for this fun project Rachel. For more from Rachel visit her:
 5 Lovely Comments | Email Article | found in D.I.Y. + Projects, Holiday Inspiration/Projects, Tutorials Print Article | Share This |
  | by Ez
Reader Comments (5)
So adorable! What a sweet garland!
xo
Melis
this is amazing. i know how i'll be decorating in a couple weeks!
What a CUTE idea, I love it. This is perfect for me to do with my nephew.
thanks! xo
omg, how cute are these?? i want a whole tree decorated with them!!
oh gosh! these are so cute! I made some out of red material for my mantel piece! (I also put them up on my blog)