Partners

Newsletter Sign-up


Lovely Sponsors


Currently Obsessed

Subscribe

Lovely Press

Disclaimer

From time to time Creature Comforts may include affiliate links to products featured in their posts and/or affiliate banner ads. However posts and featured products seen on Creature Comforts are never controlled or selected by advertisers or affiliates. Featured items are products that we personally like, and would share regardless of affiliate partnerships. If you choose to purchase an item that has been featured from an affiliate link or ad banner, we may receive a small commission on that sale.

Privacy Policy
Hosted by

Entries from December 1, 2012 - December 31, 2012

Thursday
Dec202012

The Best of Creature Comforts 2012

Hi friends! I had several fun posts that I was hoping to share with you this week, but we've had a unforeseen family crisis come up, so I'll be taking off for the holiday a bit sooner than planned. Even still, I didn't want to leave you emptyhanded, so I've put together a quick roundup of your and my favorite Creature Comforts posts of 2012. I hope you'll enjoy browsing through them over the coming week...maybe you'll even discover a few new favorites!

Thank you for being a part of Creature Comforts in 2012. I feel so fortunate to get to share this little corner of the web with all of you. I'll be back again for a whole new year of awesome posts and new goodies in January after the holidays. See you then!

Wishing you a holiday filled with all things merry and bright...and a New Year that sparkles with beautiful possibilities! xo Ez 

Wednesday
Dec192012

Current Crush: DIY Paper Diamonds and Gems

I've recently become enamored with some amazing DIY Paper Diamond and Gem tutorials that a few clever bloggers have shared recently. My limited math skills would never enable to me actually design the templates for these gems...luckily these crafty wizards have done the leg work, and all we have to do is print, fold, cut, and glue (all craft skills that I get a passing grade in). I've found that creating these bobbles is a great activity to do while getting caught up with my Netflix instant queue. I'm hooked!

The best thing about these, is that not only would these geometric pretties make perfect holiday ornaments and decor (imagine a group suspended from a branch or chandelier over a festive party table), but they'd be great for displaying in your home year 'round!

I'm actually working on a gift for my daughter to hang in her bedroom using several of these templates as my guide (and some glitter and silver leaf paint), and it's looking great so far. I'll be sure to share a photo over on my Instagram (and maybe here too) after she opens her gift on Christmas Day.

Here are a few of my favorite DIY Paper Diamond & Gem Tutorials:

Tuesday
Dec182012

High + Low: The Rhinestone Necklace

New Years is all about the anticipation and excitement of a promising year ahead. Even when it's a low-key night, I like to ring in the new year with a little bit of glamour. You could easily dress up any outfit, including the comfy standby of jeans and a tee, by adding something like the Flower Lattice necklace from J.Crew. But afterspending that comes with the holidays, I'm sure purse strings have been tightened. So I've found a few shining alternatives, at a fraction of the price, that will still have you looking like a million bucks!

Flower Lattice Necklace $228 - J.Crew | Rhinestone & Pearlescent Chain Necklace $14.80 - Forever21 | Pretty Pearl Leaf Necklace $16 - Dorothy Perkins | Hematite Large Statement Necklace $38.50 - Last Call

Tuesday
Dec182012

Color Inspiration Daily: 12. 18. 12

Monday
Dec172012

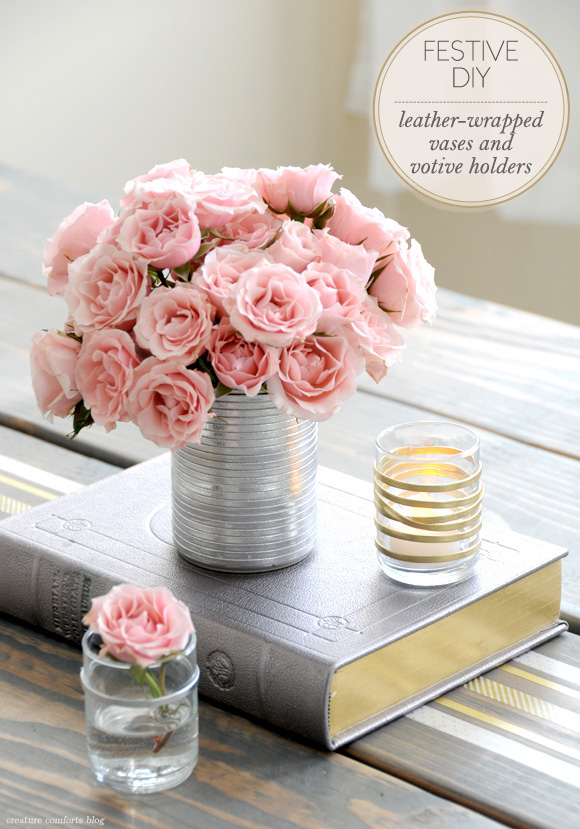
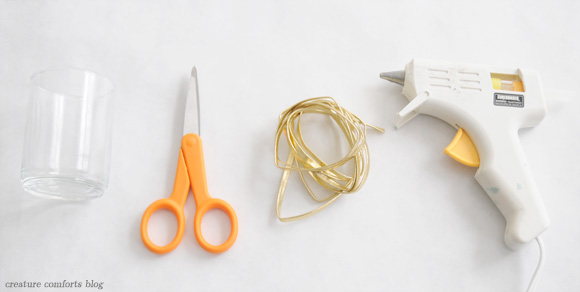
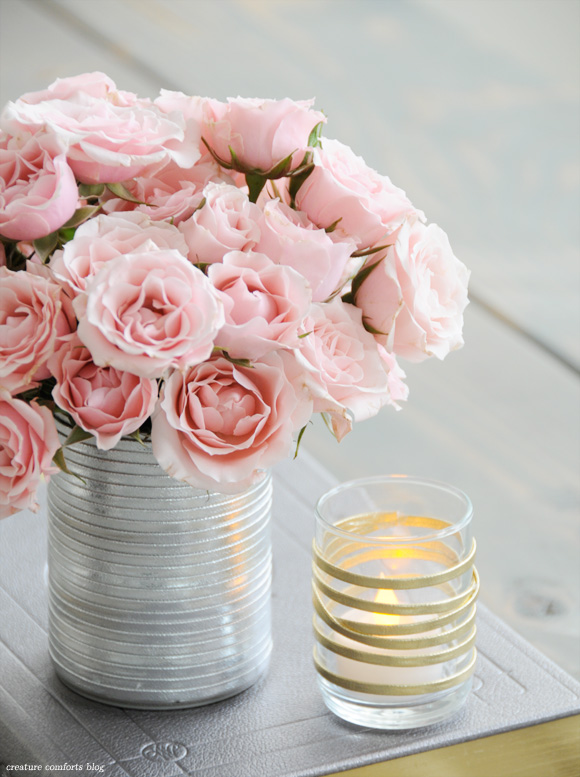
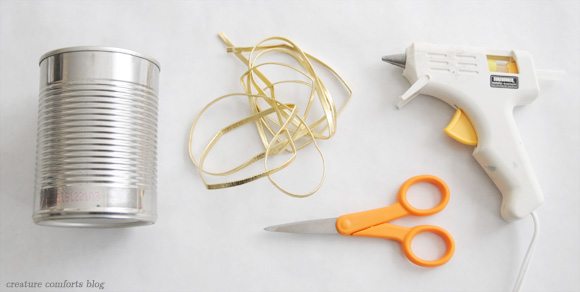
DIY Leather-wrapped Vases and Votive Holders

Hello lovelies! Today I'm back for another fun DIY that I created in partnership with my friends at Waverly. This time I thought it would be nice to create some table decor that will look just as lovely at a festive party this season, as it will in-use all year 'round.

Let's make some easy DIY leather-wrapped vases and votive holders!

DIY Leather-Wrapped Votive Holders

Gather your supplies. You will need:

  • Small glass votive holder(s) | The variety used here were purchased at Michael's
  • Sharp craft scissors
  • Realeather Craft Lace in Metallic Gold and / or Silver | Available at Michael's and Hobby Lobby (find additional suppliers here). Be sure that your leather cord has two flat sides (like a fettuccini noodle...not round like a spaghetti noodle).
  • Hot glue gun (low heat) and glue stick(s)
  • Battery-operated candles

Plug in your glue gun and allow it to get hot. Begin by squeezing a small line of glue somewhere within the top 1/3 of your votive holder. Immediately place one end of your leather down into the glue and press to adhere. If the glue dries too quickly, you can easily peel it off the glass and try again.

Once the end is glued in place, wrap your leather cord around the top of your votive holder until it meets back at the starting point.

Squeeze a drop of glue on top of the end of your cord (where you first started) and lay the loose end of your cord through it. Be sure that you have pulled the cord taught so that it is not drooping. Once this dot of glue has hardened (it should take just a few seconds) continue wrapping your cord around your votive holder.

You can keep your lines parallel or overlap them like I did here. If you want to create the overlapped look, just be sure to add a dab of glue under the cord anytime you will have two pieces laying on top of one another. Keep your cord nice and tight while you work.

When you get to a good stopping point, add a dot of glue on top of a portion of leather that is already wrapped around the votive holder, and lay the end of your cord through it to adhere. Use a pair of scissors to trim off any excess cord. If there are any bits of dried glue on your votive holder, you can use your fingernail or the tip of your scissors to carefully peel it off. Place a battery-operated candle in your new holder, and you're done!

Now on to creating a pretty DIY Leather-Wrapped Vases!

Gather your supplies. You will need:

  • Tin can(s), emptied, cleaned, and dried | Make sure to use the variety with the pull-off top so that you are not left with any sharp edges. You can also use a glass cup in place of the can if you prefer.
  • Sharp craft scissors
  • Realeather Craft Lace in Metallic Gold and / or Silver | Available at Michael's and Hobby Lobby (find additional suppliers here). Be sure that your leather cord has two flat sides (like a fettuccini noodle...not round like a spaghetti noodle).
  • Hot glue gun (low heat) and glue stick(s)
  • Fresh flowers (and water)

Plug in your glue gun and allow it to get hot. Begin by squeezing a small line of glue beneath the top lip of your can. Immediately place one loose end of your leather cord into the glue and press down to adhere. If the glue dries to quickly you can easily peel it off and try again.

Now apply another short line of glue just slightly below the top lip of your can, and directly following the portion of cord that is already attached. Don't place the glue too close to the edge or you will have a messy vase top. Place your leather cord into the hot glue, making sure to pull your cord tight as you are working so that there is no slack in the cord. Continue to work in small sections, adding glue, and placing leather cord, until you have made your way back to your starting point.

Now add a small dot of glue on top of the cord end (where you started) and overlap the loose end of your leather cord over it, angling it down slightly (as seen in the photo).

Continue to wrap your leather cord around your can, keeping the cord taught as you work, and the top edge of your cord snug against the bottom line of the cord above it. You will not need to glue the cord down along every row. If you'd like to apply a small dab of glue every few rows to make it extra secure, you can. The very top row is the only one that need to be glued down completely.

Continue wrapping cord around your can until it is completely covered. Glue the loose end atop the last wrapped row and snip off excess cord. You'll see that the leather on the back of the can angles down just a bit (nobody will notice when there are flowers inside it)...

...but the front is nice and straight.

Use your fingernail or the tip of your scissors to carefully remove any excess glue along the edges. Fill with water (carefully so it doesn't leak on the leather) and a bouquet of beautiful blooms!

Doesn't it look lovely?!

And here it is in gold!

Bonus...these vases can also double as snazzy pencil holders! I have the gold one on my desk right now!

And one last gratuitous rose photo...because I just can't help myself. xo Ez

Prop sources: Pencils - Target | Journals - Delphine Press (from a trade show), Sparrow & Co. | Silver Dictionary - received as a gift | Japanese Masking Tape - etsy | Metallic Flowers - vintage Christmas decor | 

---------

This post was kindly sponsored by Waverly. Follow them on TwitterPinterest, and like them on Facebook. The DIY content, images, and opinions shared in this post are my own.

Related Posts Plugin for WordPress, Blogger...