


Paper Scraps + Celery = Fabulous Gift Wrap
Yes, you read the title correctly... Celery! Today I put together a little photo tutorial on creating your own gift wrap and tags using celery as a stamping tool. This has been done before (it's not an original concept)... this is just my take on it.
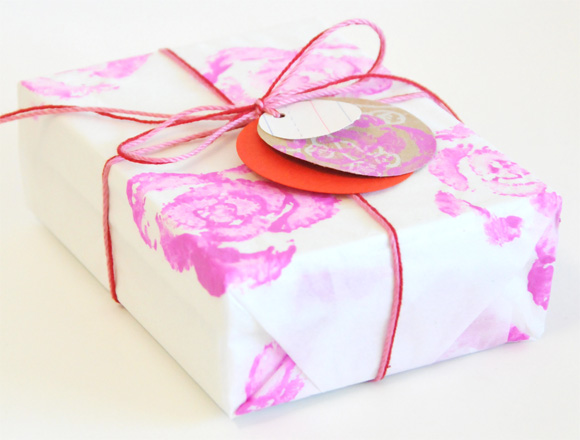
I got into trouble for calling my last project "eco" so I don't want to make the same mistake here. I do however encourage you to use paper scraps that you have laying around your home. For the wrapping shown here I stamped paper bags from Trader Joe's as well as scrap tissue paper and other tiny bits of paper I had saved up from random craft projects.
You will need:
For the Gift Tissue (shown in the main image) you will need:
- Scraps of tissue paper (white or colored)
- Scissors
- Paint (I used acrylic, but you can try other options)
- Celery stock base. You will need to have cut this as smoothly as possible to leave a nice straight stamping surface)
- Art tray or plate (basically just a flat surface that you can pour your paint onto)
For the Gift Tags:
- All the supplies listed above + paper scraps such as paper grocery bags, patterned, lined or graph papers
- Standard Hole Punch
- Large craft punches in the sizes you wish
- Twine, ribbon, or string.
Optional:
- Jazz up your package with little treasures from around your home. Buttons, beads, pinecones, mini animal figurines, etc... all have potential!
- Create sturdier gift wrap using paper grocery bags (for small gifts) or kraft papers.
- Don't forget to save the wrapping after your gifts have been unwrapped. Even if it's been torn you can still create gift tags, etc from the leftovers!
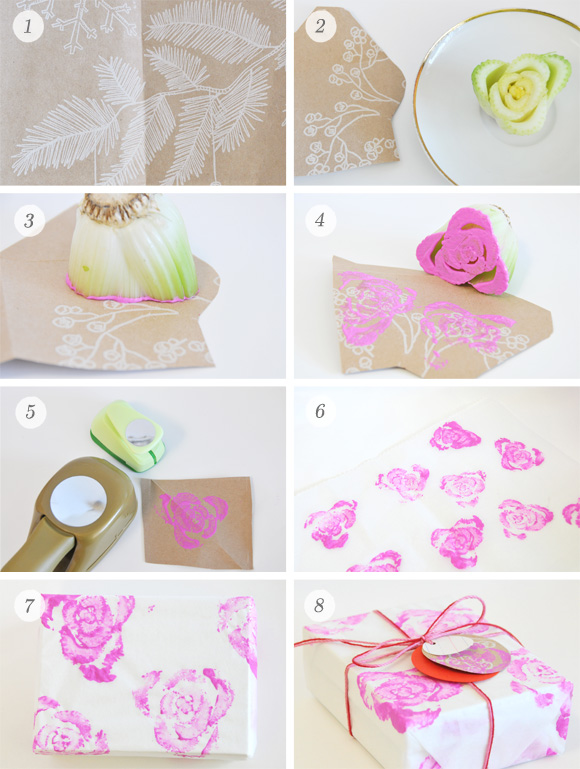
Step 1) Cut open a brown paper bag so that it lays relatively flat. You can use either the printed side or the blank reverse (I used the printed in my example because I really loved the design).
Step 2) Put paint (any color you want) onto your tray/plate (you may need to brush it around so that it's not all in one lump). Take your prepared celery stamp and dip it into your paint. Check and be sure that it's fully coated.
Step 3) Press your stamp down onto your paper with steady even pressure. Be sure not to rock it from side to side or let it slide around. Lift off your paper with a smooth motion.
Step 4) Repeat as desired. In the image I am stamping an area intended for gift tags, so I chose to make more than one print so that I could cut several tags from it.
Step 5) Once your stamp has dried (if you're impatient like me, you can dry it with a hairdryer on a low setting) use craft punches to cut out your tags. Punch at the top with a standard hole punch (so you can string twine through it later).
Step 6) Using tissue paper or other gift wrap sized paper, repeat steps above until paper is covered in as many stamps as you like. TIP: For tissue and other thin papers, be sure to place a scrap piece of paper beneath the sheet you are working on in case some of the paint comes through. If you use more than one celery stock you can overlay colors for a really cool effect.
Step 7) Allow paper to dry completely and then wrap up your gifts.
Step 8) Embellish as you like!
This is also a great project to do with the kids in your life. Always be sure to supervise, and take care when selecting your paint (you might want to pick something that is not permanent). Whomever you create this with or for, have fun!
I'd love to see pictures of your finished packages! If you'd like to share them with us leave a link to your masterpiece in the comment section below. xo Ez
 45 Lovely Comments | Email Article | found in D.I.Y. + Projects, Holiday Inspiration/Projects, Tutorials Print Article | Share This |
  | by Ez
Reader Comments (45)
Joannahttp://simpleblueprint.typepad.com/blog/2009/07/with-a-little-celery.html
joannahttp://simpleblueprint.typepad.com/blog/2009/07/with-a-little-celery.html
I did it!Loved it!Blogged about it today!http://thegiftedblog.wordpress.com/2009/09/02/tutorial-tryout-celery-printed-wrap/
I can't believe how *gorgeous* that celery stalk print is! Can't wait to try this at home.
Also, if you use Glob it On paints you could call this an eco-project and it's safer for kids to use too :)
http://globiton.com/color_blends_big.html
I saw this on In Honor of Design and I just had to come over and tell you how CLEVER and BEAUTIFUL this is!!! I love all your DIYs and wish that one day I could come up with my own!!! I may use this for the Lovely Package Exchange... I just need to get some ink!!! Oh and celery too!
amazing, another creative idea in recycling paper scraps....
Red paper + contrasting blue celery stamp = awesome
Wow, clever celery, clever you!
What an utterly inspired idea: it's the only good use I've ever seen celery put too :-)
WOW! This idea is amazing! I'm going to try...Thank you for the inspiration.
wow... least preparations, best results.
Love Love Love!
Nainital is the heart of Uttarakhand and one of the most tourist gathering hill stations all over India.