Inspiration Daily: 08. 21. 09

I Love Denim by Anita Damas | flickr | website
 Friday, August 21, 2009
 From time to time Creature Comforts may include affiliate links to products featured in their posts and/or affiliate banner ads. However posts and featured products seen on Creature Comforts are never controlled or selected by advertisers or affiliates. Featured items are products that we personally like, and would share regardless of affiliate partnerships. If you choose to purchase an item that has been featured from an affiliate link or ad banner, we may receive a small commission on that sale.

I Love Denim by Anita Damas | flickr | website
 7 Lovely Comments |
  Email Article | found in
  Color Inspiration Daily
  Print Article |
  Share This |
  | by
| by  Ez
Ez  Friday, August 21, 2009
Greetings Creatures of Comfort! Susy from SusyJack* and HeySusy, in my second guest post while Ez is on the road. How cool is it that Ez is organized enough to schedule all these cool posts while she is away? Personally, I find that *very* impressive. Ez, if you're reading this...I am in complete and total awe.
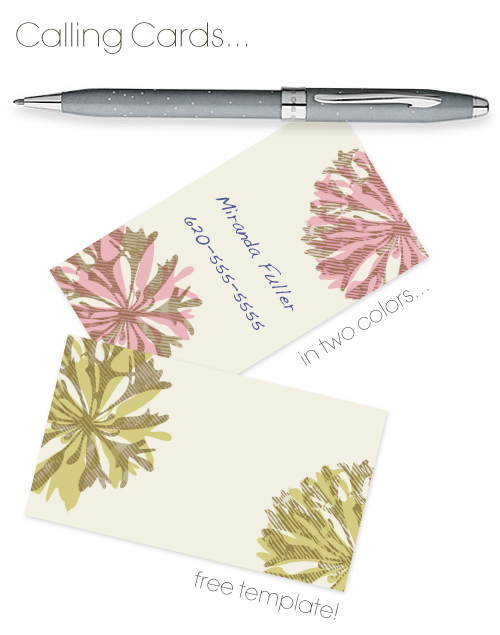
So...I've been working on some new pattern ideas lately...and I thought this would be the perfect place to try them out! I've created templates with 10 calling cards each, in two color-ways. After all, variety is the spice of life!
These would make wonderful calling cards, but they could also be used as place cards, or even to top off a gift (I think they would make a sweet accent to a simple kraft-or newsprint wrapped package). I hope you enjoy them. Just trim along the crop lines. You can also print them out, and then run them back through your printer to place your own typed message on each card, and trim when you're done.
Download Template for Pink Cards
Download Template for Ochre Cards
 19 Lovely Comments |
  Email Article | found in
  Downloads + Printables,
  Paper Goods
  Print Article |
  Share This |
  | by
| by  Ez
Ez  Thursday, August 20, 2009
  10 Lovely Comments |
  Email Article | found in
  Color Inspiration Daily,
  Photography / Styling
  Print Article |
  Share This |
  | by
| by  Ez
Ez  Thursday, August 20, 2009
 Hello Everyone!
This is Janice from Papier Valise + the scissor variations blog.
This is a quick + easy project that can be customized simply by choosing a piece of your favorite fabric.
Make 1 or several + create a display board mosaic.

Gather Together:

**Canvas Frames (any size-I used 8" square ), Cork Liner (available here, or check your local hardware store), Marking Pen, Scissors, Staple Gun...

Fabric Remnants (a bit larger than your canvas size)-I used a lightweight upholstery floral + a solid linen.

Using your canvas frame as a template, trace onto the cork sheeting and cut out.

Flip your canvas over so the front side is facing you + place your cut out cork piece on top + using your staple gun secure at the four corners and in the center of each side.
This creates a thin cushion for your push pins.
Cut a piece of fabric approximately 1" square larger around the perimeter than your canvas size. You can eyeball this, but keep in mind you need to pull the fabric up around the sides. My canvas size was 8" square, so I cut a 9" square piece of fabric.

Lay your fabric down onto a flat surface with the wrong side facing you.
Place your canvas, cork side down onto the fabric, centering it.
Choose an edge to start securing. Pull the fabric up along the edge and onto the back of the canvas frame + staple in the center. Place a staple in the left and right corners. Working on the opposite side, pull the fabric tightly + staple to secure. You will then need to tuck the fabric in at the corners, pull it up and staple.
Like wrapping a gift. Repeat with the remaining sides.

Create some push pins with some decorative items.
** The quality of your canvas frames is not so important for this project. I had these cheap ones in my stash--they were $1. each
Text + Photos Copyright 2009 Janice Rusnak
 23 Lovely Comments |
  Email Article | found in
  D.I.Y. + Projects,
  Tutorials
  Print Article |
  Share This |
  | by
| by  Ez
Ez  Wednesday, August 19, 2009


 28 Lovely Comments |
  Email Article | found in
  D.I.Y. + Projects
  Print Article |
  Share This |
  | by
| by  Ez
Ez  Wednesday, August 19, 2009