


A Story About A DIY Table and Four Awesome Chairs
Hi guys. Sorry for the late post today. It took me longer than anticipated to write this up. Anyhow, as promised, I want to share some photos and a bit about the process of creating my DIY table...including some tips I learned along the way.

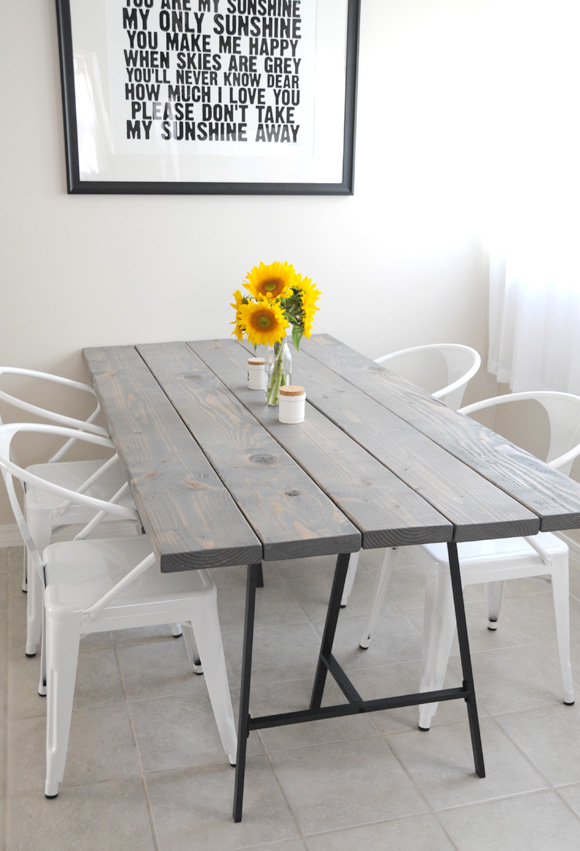
This project was a mishmash of two different DIY table tutorials that I fell in love with — this DIY Table from Stylizimo and this version from Our Vintage Home Love. I went into this with very little knowledge when it comes to building things with wood, and while the end results are probably far from perfect, I love my new table...wonkiness and all.
Here are some of the process shots I took and shared over on instagram with detailed notes on each step:
- The total cost for supplies for this project including the wood (not including the legs) came to $140. I purchased everything (except for a power drill/screwdriver and leather work gloves that I already owned) at Home Depot (I'll include a full list of supplies at the end of this post). The great thing about their store is that they will cut the wood you need to the exact size specifications that you want for no extra charge. Note: You do have to buy the wood at the cost of the full board regardless of what size you have it cut to. That is probably a no-brainer, but I didn't know that until checkout. For my table I had five 2x8 untreated boards cut to 6' each and then two 1x4 boards (thanks Chris for the updated info) cut into 4 portions of 3' each (I only ended up using 3 of them). The table legs are from IKEA (purchased online) and including shipping came to $40.
- I was so glad that I purchased an electric sander. It would have taken me weeks to sand the boards down by hand. With the sander it took me two afternoons (it was also blazing hot outside, so I probably could have done it easily in one afternoon if it had been cooler out). I followed the sanding grit recommendations on Our Vintage Home Love, and it worked really well.

- I found sanding to be really enjoyable (maybe I'm a bit nutty). Seeing my finished and oh-so-smooth boards all stacked up and ready to be made into a table was really satisfying.
- I wanted to achieve a similar stain on my table that Stylizimo did on hers, but wasn't able to find the brand that she used. Fortunately after a bit of online research I discovered that Minwax makes a grey stain that looked like a decent match. I stained and waxed according to the directions on Our Vintage Home Love...but only used one coat of stain (left on for the minimum amount of time) and did not sand after staining. The end results are probably a bit more grey than I would like, but I do think it has a really nice aged wood look...which is what I was going for.

- A note about staining and waxing...it is really messy (and stinky), so be sure work in a ventilated area, wear proper work clothing, and protect the surface you are working on as well. I had grey stain leftover on my legs and toes for days (most of it came off with nail polish remover thankfully).
- Once the wax was dry my daughter helped me bring the boards inside and we laid them out to be assembled. Unfortunately I quickly discovered that the screws I'd purchased were not long enough, so I had to run out and get longer ones. I decided to use my support boards in three positions across the bottom of the tabletop. They are arranged with two of the boards at 9" in from the ends, and the third board centered between those (at around 21.5"). The finished table top is pretty heavy...so you will definitely need assistance to place it on the legs. If I were to do this all over again, I might try thinner boards (although it seems like those might warp easily over time).
Another note: I was overly-excited about having the table set up in my house and made the mistake of bringing it in directly after the wax/stain had dried. The fumes were so overpowering after an hour that we ended up having to take it back outside for another two days so that it could properly outgas. Pew!

Here are two peeks at the underside of the table. You can see that I got a little bit excited while using the power screwdriver. It seemed safer to err on the overzealous side...I definitely don't want one of these boards coming off on my legs while I'm eating breakfast!

When selecting boards it is also a good idea to visually inspect each one before having it cut. I didn't happen to notice that one of my boards was super rough and chipped along the edge and it was quite the task to sand it down. I actually like the aged effect that it has going on, but I thought it was worth mentioning incase you want something a bit smoother.

And there you have it. A very labour-intensive DIY, but one that I am extremely happy with. I can't really even describe how gratifying it is to sit down to a meal at a table that you personally created and worked so hard on! Definitely worth $180 in my opinion!
Ohhh...and the chairs! I spotted these White Tabouret Stacking Chairs from Overstock.com over on Pinterest, and at $180 for 4 chairs (and tons of positive reviews) I couldn't pass them up (plus it was only $2 for shipping). They are surprisingly comfortable...the curve of the back is just right, and are a great weight and size. The only negative I have to say about them is that one of the chairs has plastic shipping material melted onto the leg and we are having a hard time getting it off. I'm sure this has more to do with the scorching 115 degree temperatures we've been having (probably hotter in the back of a shipping truck) than anything on Overstock's part. I'm hopeful that we'll be able to remove it with some special cleaners and a bit of elbow grease.

DIY table supply list:
- Five 2x8 boards cut to 6' in length
- Three 1x4 boards cut to 3' in length
- Ryobi Sander
- Sanding paper in 220 and 150 grit (make sure you have plenty on hand)
- Leather / cloth work gloves
- Rubber gloves (for use while staining/waxing)
- Drop cloth (I used a plastic cloth because it was the most affordable option)
- Clean cotton rags (you will need quite a few)
- Tack cloth (a sticky cloth sold in the painting section, used to pick up fine dust particles before staining)
- Wood Screws, 1-3/4" (as you saw earlier...I used a lot)
- Power screwdriver
- Paintbrush - I used a 3" brush made for use with stains
- Minwax Wood Finish in Classic Gray 271
- Minwax Paste Finishing Wax in Natural
- Vika Lerberg Trestle Legs from IKEA
- You will also need some sort of a sawhorse or raised work surface that can get messy when sanding and staining. I used an old desk (for the sanding portion) and two scrap blocks of wood (for the staining portion).
 52 Lovely Comments | Email Article | found in D.I.Y. + Projects, Home Decor Print Article | Share This |
  | by Ez
Reader Comments (52)
This is so beautiful and you are so talented!! I can't wait to see it in person! (someday. when it's not 1,000,000 degrees outside. then I'll come visit you.) xox
Omg, it is stunning hunnie! And I LOVE the chairs too! So great, I love the grey you chose and the sweet little numbered pots look great there, with the flowers and your poster! YAY! SO fantastic!
xo
Melis
I absolutely *love* your table. Saw it on instagram first and was so excited to see your post! Thanks for such detailed notes; I'll likely be needing them!
It looks so professional! I love it and the fact that you did it makes me want to do one for us. Not yet but someday!! I wonder if it works for outdoors, I'm thinking no but I'll go find out in the link you gave. Very very nice Ez!
wow! great job...love the chairs too, im soo keen to buy some new white chairs! great deal!!!
I love it!!
your new table looks so, so great!
i love this DIY! i just ordered the chairs. thank you for the brilliant tip. i even got free shipping and $9 off with a promo code found on retailmenot.com.
thanks!
inspiring Ez! - just might have to try this!
I need a little push to have this done by myself.
Gorgeous table! I love it! I completely agree with you about the sanding. I just put in headphones, listen to music, and find it very relaxing. I re-did an old Federal style desk, and it took hours of sanding:
http://www.pardonoursawdust.com/category/furniture-projects/
Thanks for sharing - I love your blog!
I love all the work that went into the table and chairs, but I think my favorite thing that I noticed is your poster with the lyrics of "You are my sunshine" hanging on the wall. Brilliant!
Awesome job! We're trying to find a new kitchen table, but your post has inspired me to want to make my own instead of buying! Thanks for all the tips!
Obsessed with this and is now on my bucket list of DIY projects for my next home. Thanks!!
I LOVE your table! And the use of the trestle legs from IKEA is brilliant! Did you use cedar for your wood? The color and grain is lovely!
love it! We have been struggling to find a table the right size and now we can make one! I even have table legs in storage. perfect thanks
Thanks for the super detailed tutorial, thinking of making myself a dining table at the moment as I can't find one the right size/shape for what I want anywhere. Shall be trying this out in the next few weeks, although with less beautiful results I'm sure!
Awesome table you have here! I'm looking to make something similar out of Ikea's table top :) Did you secure the trestle legs onto the table? If yes, may I know how did you do it? Thanks so much!
I love this DIY! Question--do the table legs from IKEA screw into the table or simply sit underneath? Have you found them to be a sturdy option? Thanks!
I was just planning on a rustic/modern look for my dining room and then I stumbled upon this post from Curbly. Love it! An so the look I am going for :).
We built our new dinning room table using your post as a guide (I credited you here: http://averetenere.blogspot.com/2012/11/gather-new-table.html) - we love, love it. Thanks!!
Hi! I am tackling this table this weekend...has anyone else tried? I am on the fence to use 1 inch or 2 inch thick boards. Would love feedback!
Your table turned out so great Sarah! Thanks so much for stopping by to share your link with us! xo Ez
Hi Devin! I used 2" boards for mine. The finished table top is very heavy, but is much less likely to warp over time like the thinner boards might. If you do use thinner boards, you might consider placing more 1x4 boards across the underside (I used three for mine) so that it doesn't bow. Good luck. Let us know how it turns out! -Ez
Hi Mary! Sorry for my late reply. The tabletop sits on top of the IKEA legs and doesn't screw in. If you wanted to attach it with some C-shaped brackets (I don't know the technical name) you could certainly do that. Since the tabletop is so heavy, it doesn't move around much on its own. If you have young kids, you might want to find a way to make it a bit more stable though, just to be on the safe side. xo Ez