


Souvenir Foto School: Day 13 - J for Jam
;)
Today I really wanted to work on getting some great shots in camera that didn't "need" post-editing. I find that once you start Photoshopping things it's easy to feel as though nothing is good enough, so for me it's a challenge to allow an image to just be.
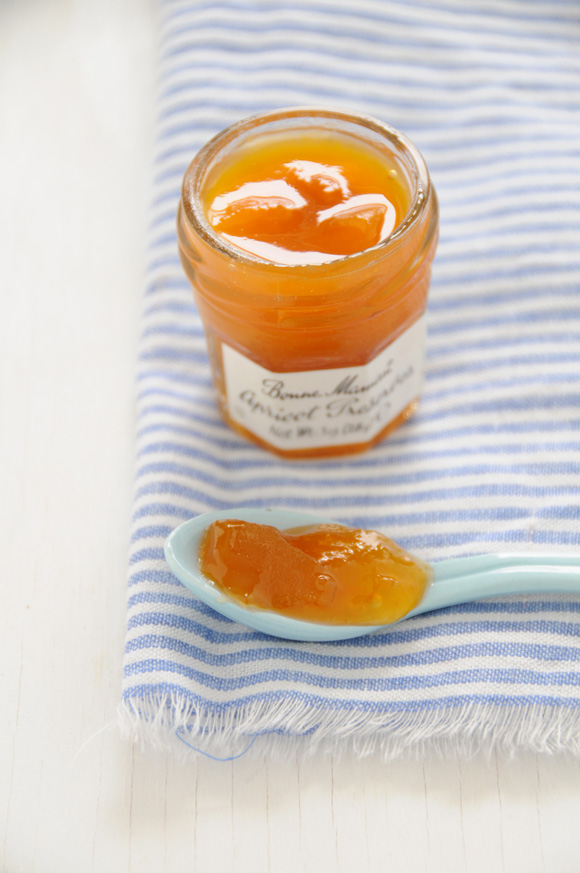
I can definitely see things that I could "fix"...such as the giant crease in the fabric in the left-hand shot, but I'm forcing myself to leave it alone (so.very.hard).
Again, the light was really crummy and grey here today, so I photographed these using the same double foam core board bounce set up that I used on Saturday's images. It really does wonders for a photo. For those of you who are more visual (like I am) I also thought it would be nice to actually show you how I've been using the foam core board to bounce light into my photos. Here's the fancy-schmancy set up (photographed with my iPhone):
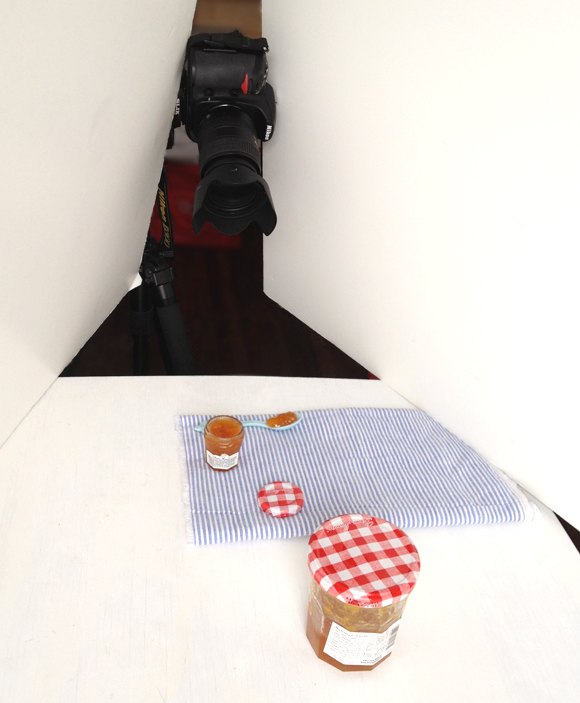
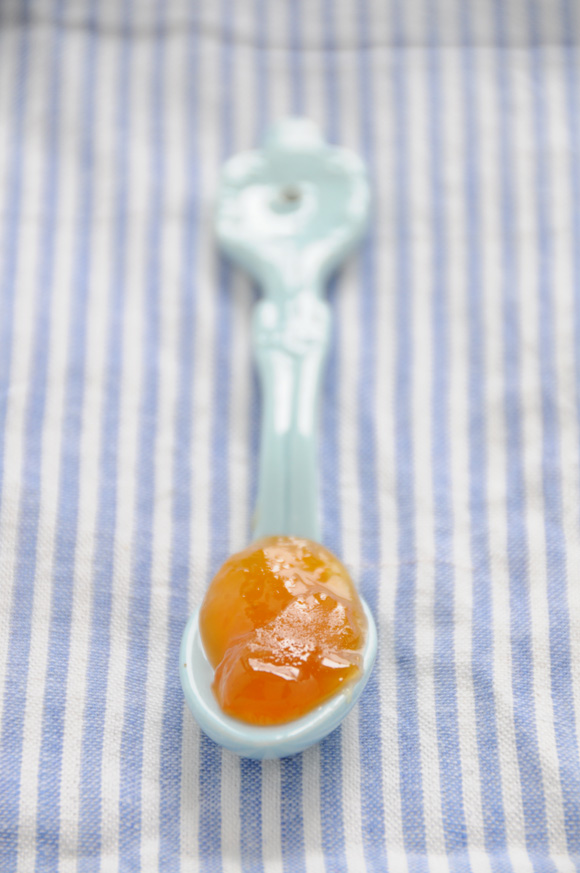
I like to have my photos back lit a lot of the time, so I have this little makeshift photo board (just a board painted white) sitting in front of my office window that I use as my "table." My camera faces the window and I place my foam core board in a V facing out from it so that it bounces the window light straight back into the shot and takes out the heavy shadows. I also have half of my window covered in waxed paper to soften the light a bit (I'm sure my neighbors think I'm nuts). Here's what the photo looks like with and without the boards (there was no editing done to either photo, and I used the same settings on my camera for both shots):
;) Tip: Click on the image to see it larger in a pop-up window.
Tip: Click on the image to see it larger in a pop-up window.
Credit: I first learned this bounce trick from Nicole of Nicole's Classes (using one board). And btw, if you are ever looking for an online photo course to better yourself I can't recommend it enough! Super awesome and fun!
Prop notes: The little blue spoon was part of a Sugar set from Anthropologie and was given to me by my friend Melis, and the blue "napkin" is a piece of folded fabric. Foam core boards are available in craft and office supply stores for a couple dollars a piece.
If you'd like you can also find all my images in individual and diptych form for this month-long class challenge over in my flickr album. | Souvenir Foto School is offered by Besotted Brand.
 34 Lovely Comments | Email Article | found in About Me / My Shops, Photography / Styling Print Article | Share This |
  | by Ez
Reader Comments (34)
Really great information here. Thanks for sharing.
The board really make an incredible difference - I'm just beginning to learn how to use our fancy-schmancy camera so I'll have to give this a try. We kind of have crummy light in our house even on sunny days, so I'm sure it'll come in handy. I love that blue spoon too, by the way :)
Wow! Great info. I'm excited to sign up for one of Nicole's classes. Thank you so much!! PS. love the blue spoon...it's the little things isn't it?
i think the pictures are beautiful! thanks for the photography tips :)
After seeing this, I'm definitely gonna purchase a couple of white foam boards from MIchael's in the near future. Can't wait to try it! The lighting in these photos turned out great!
I found this tip on using the foam board incredibly helpful over the weekend. I saw it mentioned in one of your posts last week. It's a really hand y little trick as I too like to use back lighting and this trick really softens and brightens an otherwise gray photo. Thank you so much for posting what you are learning. I really want to take one of Nicole's classes in the future. Your photos this month have been stunning.
I am loving your post this month from this class. I definitely want to take on of Nicole's classes in the future. Thank for sharing this super useful trick.
I love your blog! It is my daily dose of lovely. And you really take wonderful photos! I love how light everything is and I love the white background you use! No photoshop necessary :)
i love that you're sharing your process. thank you! my problem is that i run out of patience, but you've inspired me to give it more effort!
this is so helpful, thank you for sharing! i can so relate to what you said about photoshop...
Thank you for this - very informative!!
Thanks for the info and including the picture of your set-up. I have used one foam board, but never tried 2 as you did. The pics are oh-so beautiful too!
It's nice to see the with and without comparison, thank you. Also, don't worry about that crease, I think things like that add to the whole feel of the photo, in this case, a homely feel.
wow, interesting. i will give this a try one day. great pics!!!
Oh thank you so much for sharing your set up tricks! I have very little natural light in my apartment and am always frustrated about what to do. Your photo of one of my favourite jams is beautiful too :)
Hello. I've been enjoying both your photos and your descriptions of your process. I did want to say something about photoshopping. It distresses me. Photography, in my mind, is supposed to be about capturing a specific moment in time; a "real" moment. If the focus becomes making things look perfect, it's no longer about the moment. Anyone can correct a photo into perfection, but I think art happens when there is beauty in a photo, despite the flaws.
Thanks for this tip! I'm going to use this for sure!
Yay, still love that little sugar set....:) This is super cool to see the "behind the scenes" as you know, my picture taking needs so much help....why didn't I sign up for the class at Alt?! sigh....All of your photos are so beautiful hun.
xo
Melis
Hello,
Thank you for such a helpful post. If possible could you share lens and the settings that you used. I am new at this dslr thing and I fumble around with my Nikon learning more each day. I am enjoying and loving each photo you share.
Thank you and I am so glad I found your blog.
Deborah
i've never seen the two-sided foam core board idea. i'm going to give it a try and your pics from the class look great. thanks for sharing your tips!
I didn't have time to write yesterday, but this is so great to see!I've never tried a triangle foam board set-up so smart! And I agree Nicole's photo 101 is a really great class!
Thanks for sharing your light set up! It made such a difference, and I love being able to see your photos unedited. I take most of the photos for my blog on our little apartment patio...sometimes with neighbors walking by or kids playing outside. I feel a little self-conscious sometimes, but you've gotta do what you've gotta do to get the best light! Would love to try your light-bouncing technique sometime soon.
This was a wonderful post and the visual was very helpful. Your pictures are beautiful and I would love to see more photography tips and basics from you.
Thanks for sharing the picture of your setup - having a visual goes a long way in explaining the tricks of the trade.
Hi Ez!
Thank you for this great post! It sure going to improve my product shoots for my invitations. It's hard getting natural light when you live in Northern Sweden and half the year it's dark! I have to drop everything that I am doing when I see a peek of the sun come through for an hour or so (if lucky) to make the most of the natural light I get during winter (like now), but now I know your secret, I'm sure it will improve my photography!
Any tips, when the light is more of a blue shade? I often get that in winter. I'm pretty sure its the reflection of the snow. No probs when summer comes around.