


Web Help: Creating a Basic Animated Ad
Sometimes you want an ad that has a little bit more to offer. A static (or stationary ad) is nice, but it can't always express everything you would like your ad to in just that one frame. Thank goodness there are animated ads!


Static vs. Animated
It wasn't until just a little bit ago that I learned how to create a basic animated ad in Photoshop. Before that I was completely baffled and frustrated by the entire concept. I'm not an expert by any means, but I receive a lot of emails requesting help on how to put one together, so I've created a little tutorial that I hope will be of use to some of you. It may seem long and complicated at first, but once you create your own you will see how simple it really is.
I know that this content will only be of interest to some of you... my apologies!
For this tutorial you will need to be using some form of Adobe Photoshop (I use Photoshop 7). Basic knowledge of Photoshop would be useful. All measurement are in pixels (abbreviated as px). Image resolution is measured as dpi (dots per inch).
 First you will need to determine the dimensions of the ad you will be creating (my blog column is 160 px wide so I made one that would fit that). If you don't know the size of a column you will be creating an ad for simply right click an image that already exists in the column. A little box will pop up... click on "properties"... the image size will display in a little box.
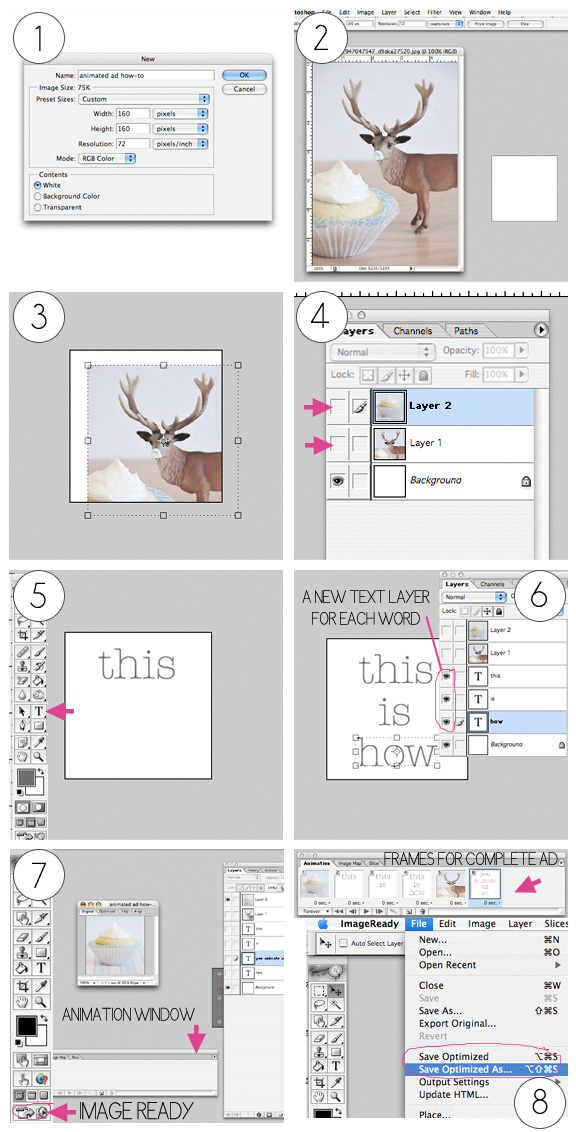
Step 1) Create a new project in Photoshop by going to File>New. Name your file and set the correct dimensions. Set the Resolution>72dpi. Contents>White. Click OK. A small white box should appear on your screen. The is the "canvas" where you will create your ad.
Note: Be sure that your Layers tab is open. If it's not, go to Windows>Layers.
Step 2) Open any image file you will be using for your ad. File>Open>select your file>Click OK and it will open. Repeat to open any additional images as needed.
Step 3) You will need to crop your image to fit inside your ad. For this example I made my images the same size as my ad. To crop you will select the Crop tool (see image 3). Set your crop dimensions at the top of your screen to the desired size. Drag the crop tool across your image to select the portion you'd like to keep. Press Enter on your keyboard to crop.
Step 4) Drag your cropped image onto your blank canvas. Center your image or place it wherever you'd like it to be in your ad. Repeat with additional images. Note (image 4) that in your Layers tab there will be an icon of an eyeball next to each image you add to your canvas. Click on the eyeball and it will hide your image. Click it again and it will reappear. This is a very important part of creating your ad. Once you have added all your images (not text... just images) click the eyeball next to each image over in your Layers tab to hide each one. Now you will be back to a blank canvas. Time for some text.
Step 5) For text that rotates (optional) you will need to create your words using more than one Layer. i.e. If you want to say Happy Birthday, you will use a different text Layer for each word. Using your Text tool type your first word on your canvas. Notice that there is also an eyeball icon next to this new text in the Layers tab.
Step 6) Create a new layer for your next word. Click Layer>New>Layer. Use your Type tool and write your next word on your canvas. Line it up how you'd like. Repeat as you'd like.
Don't forget to save your work as you go along. Be sure to save your work as a PSD file.
Step 7) Once you have all your text added how you'd like it, open Image Ready (see image 7). Once Image Ready loads you may need to open the Animation window. Do this by clicking Window>Animation. In your animation window you will see a small frame. This will be the first animated frame of your ad. To set the correct image or text inside it you will click on the eyeball next to the image you want displayed (over in the Layers tab). Turn off the eyeballs for any image you don't want showing. In this example I only want my cupcake photo to show, so that is the only image in the Layer tab that has an eyeball open next to it. In the Animation window you will see a tiny number under your image. Click that and set the speed of your image rotation. You may need to ad a custom speed. I think 2-3 seconds is a good speed. Anything faster hurts my eyes.
Save as you go along. To save you will need to go to File>Save Optimized As>Name your file and make sure that it is saving as a gif.
Step 8) After you have set your first frame you will want to follow the same steps to create the rest of your ad. In your Animation window click the little square next to the trashcan that says "Duplicates Current Frame" when you mouse-over it. Another animated frame will add onto your file. It will be of the same image you have in your first frame... so to change this, simply click on the eyeballs next to the images or text that you want to bring to the front and/or hide. Continue adding frames as needed. When you are done you can preview your image by clicking the Play button in your animation window. Save your image as noted above... and you're done!
Here's how it looks all together: 
I know this seems very long and complicated, but it shouldn't take you too long to master. If all else fails try doing a search online for additional tutorials on creating animated ads. I'm sure others have explained it better or more thoroughly than I have. xo Ez
 16 Lovely Comments
Reader Comments (16)
Love is...TL
http://creativetechs.com/tipsblog/build-animated-gifs-in-photoshop/