Color Inspiration Daily: 08. 30. 12
Untitled by Nishe - Portfolio / Blog | Espresso + Chocolate (via) by Linda of Call Me Cupcake - Blog
 Thursday, August 30, 2012
 From time to time Creature Comforts may include affiliate links to products featured in their posts and/or affiliate banner ads. However posts and featured products seen on Creature Comforts are never controlled or selected by advertisers or affiliates. Featured items are products that we personally like, and would share regardless of affiliate partnerships. If you choose to purchase an item that has been featured from an affiliate link or ad banner, we may receive a small commission on that sale.
Untitled by Nishe - Portfolio / Blog | Espresso + Chocolate (via) by Linda of Call Me Cupcake - Blog
 3 Lovely Comments |
  Email Article | found in
  Color Inspiration Daily
  Print Article |
  Share This |
  | by
| by  Ez
Ez  Thursday, August 30, 2012
A couple weeks ago I posted an instagram snapshot of a quick little DIY Geometric Gem Clay Mobile that I'd made with the clay I had leftover from my DIY Clay Nursery Mobile project, and offered to share a tutorial if anyone was interested. Since several of you were, I've put together a quick step-by-step guide so that you can easily make your own. The process and techniques are almost the same as my previous DIY, so I'll be referring to that for most of the project. Grab you're supplies and let's start crafting!

Supplies needed:
Cover a smooth hard working area with a piece of waxed or freezer paper (freezer paper, waxed side up works the best). Use your rolling pin to flatten your clay into a smooth disk. The finished piece should be rolled to about 1/4 inch thick. Use your craft knife to carefully cut triangular shapes into your clay (you do not need to cut all the way through). You can make this process more efficient by cutting multiple triangles on each rolled disk of clay (as seen demonstrated in the image above).
Now cut away the outside edges and separate each triangle from one another. Cut off the two corners at the wide end of the triangle (shown above). You can make the angle of these cuts as deep or as shallow as you'd like.
Dab your finger into a bit of water and smooth it along the edges of your shape. You can smooth the front and back as well. Use a bamboo skewer to make a small hole at the top of your geometric gem shape.
Make as many gems in as many different sizes as you'd like. For my mobile I used eight gems in a variety of sizes from small (around 3/4") to large (around 2").
Allow your gems to dry completely (24 hours is optimal). You may need to prop them up on their side against something so that air can circulate around them.
Once your gems are dry, you can add detail to them using a metallic paint pen. The following are the steps I used on mine, but you can draw inside your shapes however you'd like.
First start by drawing around the inner outline of your shape. then draw two short lines angled downward from the lower points on your gem shape.
Connect those two lines with a straight line across the middle. Where the first two downward angled lines ended, draw two long lines down until they meet at the narrow point of your gem.
Draw two short lines angled upward and out from where your last two lines started. Finish the design by drawing three straight lines within the upper portion of your shape...these should mirror the first three lines that you drew.

Hooray! Your gem is complete. Now you can draw the same design on the backside and repeat this process with all remaining gems.

To assemble your mobile place a small dot of glue into the hole at the top of your gem. Knot the end of a piece of twine and place the knotted end inside the hole. Use your bamboo skewer to press in and ensure that that the twine is fully embedded inside the hole. Lay your glued piece aside and repeat process with all remaining gems.
Tip: I kept all my twine portions long (around 26 inches each) until the very end so that I had the ability to arrange them at different lengths depending upon how they looked when strung together.
Once the glue has dried, arrange the gems in whatever order you'd like and tie all twine portions together in one knot to secure. Snip off any uneven ends.

Hang your gem mobile on a nail or with a piece of Japanese making tape!

Bonus idea: Pierce a small hole through the top of a clay gem while it is still soft. Once dry you can use it to embellish a gift. Just string the gem onto a piece of twine or ribbon and you're done, tie it to your present and you're done!
I hope you liked this sweet and simple project. If you want more, I invite you to check out all my past Creature Comforts' DIY projects right here. xo Ez
 Wednesday, August 29, 2012
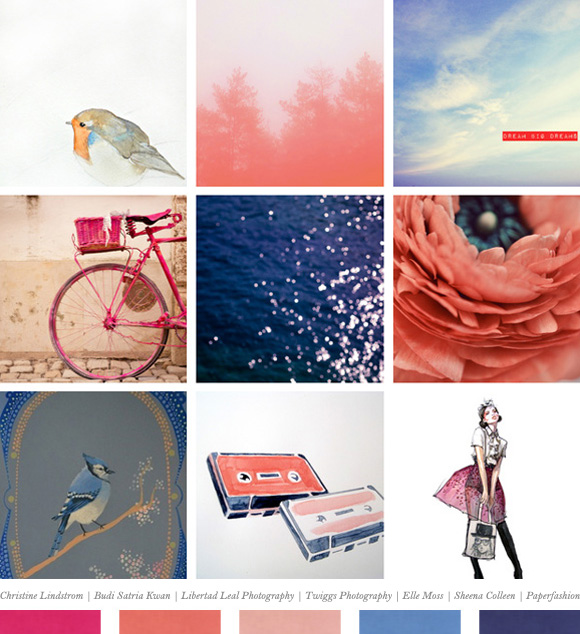
I was looking for an inspiring image to share today over on Society6 when I noticed this grouping of favorites I had previously collected. Their lovely color palette jumped right out at me, and even though I already shared two of the photos here on CC individually, I decided that as a group they were too pretty to ignore. Check out the links below for full sized views of each print or to purchase them. xo Ez
1. Hush Now by Christine Lindstrom | 2. Out of Focus by Budi Satria Kwan | 3. Dream Big Dreams by Libertad Lead Photography | 4. The Lady in Pink by Twiggs Photography | 5. Sweet Dreams by Twiggs Photography | 6. Apricot by Elle Moss | 7. Bluejay by Sheena Colleen | 8. Pink Cassette Tapes by Sheena Colleen | 9. Chanel Iman by Paperfashion
 3 Lovely Comments |
  Email Article | found in
  Color Inspiration Daily
  Print Article |
  Share This |
  | by
| by  Ez
Ez  Wednesday, August 29, 2012
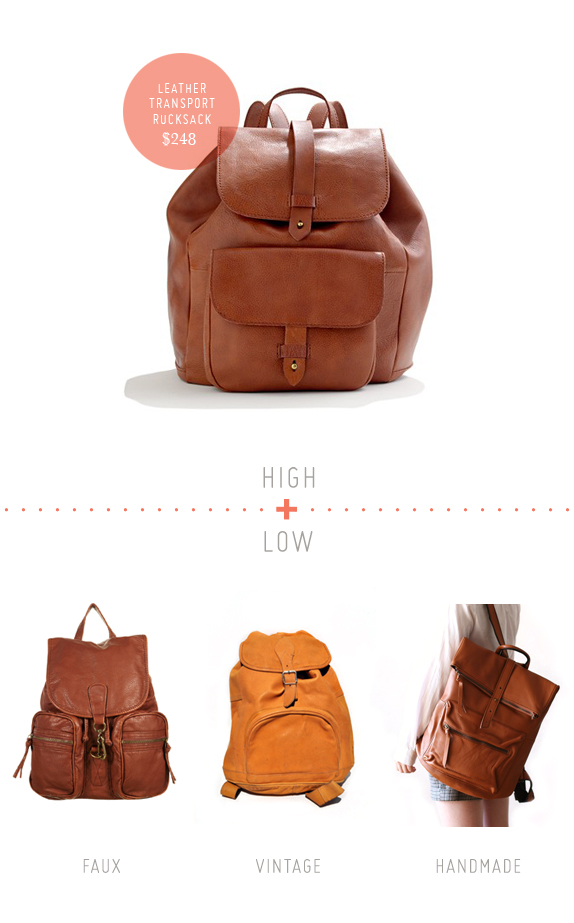
  For our first High + Low, I drew inspiration from the Back to School craze. Even though my days of student life are long gone, I always fall victim to it! There are quite a few stunning backpacks out there these days, but the price tag usually scares me off. I've been coveting this Leather Transport Rucksack from Madewell since I first laid eyes on it: simple design in a great brown leather with brass details, perfect for fall. I knew there had to be others like it for less, and lucked out in finding three great options. I don't know about you, but when given a stylish, less expensive, handmade alternative, I take it! - Julie
I'd also love to hear from CC readers. If there's an item you're seeking affordable alternatives to, comment below with the item and link. You might see it in an upcoming post!
The Leather Transport Rucksack $248- Madewell | Large Washed Clip Backpack $57- Topshop | Vintage leather rucksack $125- Annie Haul | Handmade leather backpack $150- Studio 731
 8 Lovely Comments |
  Email Article | found in
  Fashion + Style
  Print Article |
  Share This |
  | by
| by  Julie Doan
  Tuesday, August 28, 2012
Hi friends! Today I'm over the moon to announce a brand new addition to the Creature Comforts team. Please join me in welcoming the lovely and ever so talented Julie Doan! Hooray!
Julie is not only a super savvy designer/creator extraordinaire (you might remember her from her old blog Perfectbound or her beautiful design portfolio), but she also has a hidden talent for tracking down crave-worthy goodies from around the web that suit multiple price ranges. She'll be putting this helfpul skill to use in High + Low...a brand new Creature Comforts series that she's crafted just for you. Her first installment is coming up next. I know you're going to love it and everything Julie has in store for us. While you're waiting, pop on over and take a peek at Julie's about page and learn more about this awesome lady. xo Ez
 Tuesday, August 28, 2012